-

- No Comments
- December 3, 2025
How to clear faults using Diagbox
Introduction
When it comes to diagnosing modern vehicles, Diagbox is a powerful ally. Designed primarily for Peugeot, Citroën, and DS vehicles, this diagnostic software connects directly to your car’s ECUs (Electronic Control Units) to read, analyze, and manage fault codes. From engine glitches to electronic system errors, Diagbox gives you a clear window into your vehicle’s inner workings.
However, simply detecting faults isn’t enough. Clearing ECU faults correctly is just as critical. Erasing codes without proper understanding can mask underlying issues, lead to recurring problems, or even compromise vehicle safety. That’s why a methodical, informed approach is essential.
This blog is your step-by-step guide to safely using Diagbox to detect, review, and clear faults. Whether you’re a DIY enthusiast or a professional mechanic, you’ll learn how to navigate the software, manage fault codes responsibly, and ensure your vehicle stays in top shape.
2. What You Need Before You Start

Before diving into fault detection, it’s important to have the right tools and take necessary precautions. Doing so ensures a smooth process and avoids potential mishaps.
Tools and Equipment
- Diagbox Diagnostic Interface: The essential device that connects your vehicle’s ECUs to the software.
- Laptop or Diagnostic Device with Diagbox Installed: Ensure your Diagbox version is up-to-date for compatibility with your vehicle.
- Vehicle with OBD-II Port Access: Most modern cars have this port, usually located under the dashboard.
Precautions
- Ignition and Battery Stability: Ensure your car battery is fully charged and the ignition remains stable throughout the process. Sudden power loss during diagnostics can corrupt ECU data.
- Backup Important Vehicle Data: If possible, save or export your vehicle’s fault reports before clearing them.
- Understand the Limits: Clearing faults does not repair underlying mechanical or electrical issues. Only erase codes after diagnosing the root cause or confirming non-critical faults.
3. Connecting Diagbox to Your Vehicle
Getting started with Diagbox begins with properly connecting the interface to your car. A solid connection ensures accurate readings and prevents interruptions.
Step-by-Step Instructions
- Locate the OBD-II Port: Typically found under the dashboard near the steering column. Consult your vehicle manual if unsure.
- Connect the Diagbox Interface: Plug the diagnostic tool securely into the OBD-II port. Avoid loose connections.
- Launch the Diagbox Software: Open the application on your laptop or diagnostic device.
- Select Your Vehicle Make & Model: Choosing the correct details ensures the software communicates with the right ECUs.
Tips for Smooth Connection
- Use a reliable USB port and avoid hubs that may cause intermittent signals.
- Keep your laptop battery fully charged or connected to power to prevent shutdowns mid-diagnosis.
- Ensure the vehicle is in a stable position (engine off unless otherwise instructed by the software).
4. Running a Fault Detection Scan
Once your Diagbox is connected, the next step is to scan your vehicle’s ECUs for faults. This process reveals all stored error codes and provides insights into potential issues.
Step-by-Step Instructions
- Navigate to “Fault Finding” or Equivalent Menu: Open the diagnostic menu that allows you to scan for faults across all electronic modules.
- Initiate a Full ECU Scan: Start the scan to detect every fault stored in the vehicle’s system. Depending on your car, this may take a few minutes.
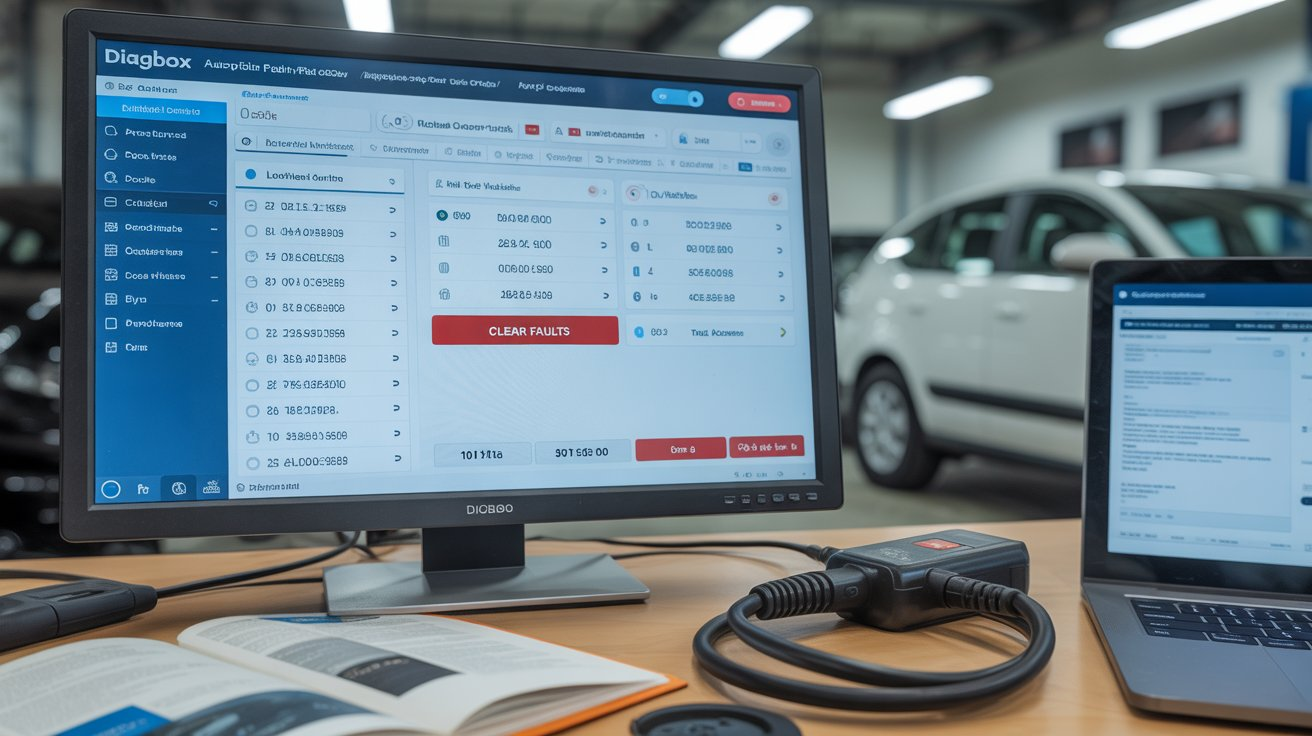
- Review the Scan Output: Once complete, Diagbox will display a list of faults, including:
- Fault Codes (DTCs) – standardized identifiers for specific issues.
- Descriptions – a brief explanation of the fault.
- Affected Modules – which ECU or system the fault relates to.
- Fault Codes (DTCs) – standardized identifiers for specific issues.
Tips for Interpreting the Initial Fault Report
- Focus on repeated or critical faults first.
- Use Diagbox’s fault description as a reference, but consider consulting official manuals for detailed context.
- Take note of freeze-frame data if available; it provides conditions under which the fault occurred.
5. Reviewing Detected Faults
After the scan, it’s essential to carefully review each fault to understand the scope of issues and prepare for safe clearance.
Step-by-Step Review
- Expand Fault Codes for Detailed Info: Click on each fault to see module location, severity, and any additional technical data.
- Export or Print the Fault Report: Documentation is helpful for tracking recurring issues or providing a mechanic with reference.
- Understand Affected Modules and Fault Types: Identify whether the fault is related to engine, transmission, electronics, or other systems.
Advice for Prioritizing Faults
- Critical Faults: Safety-related issues, such as braking or engine errors, should be addressed immediately and not just cleared.
- Non-Critical Faults: Minor faults like sensor alerts can be reviewed and cleared if confirmed safe.
- Always confirm the nature of the fault before attempting clearance to avoid masking persistent problems.
6. Clearing Faults with Diagbox
With the faults identified and reviewed, you’re ready to clear the ECU codes. Follow these steps carefully to ensure proper fault management.
Step-by-Step Guide
- Select the “Repair” or “Clear” Option: Within the fault management interface, choose the option that allows you to erase the selected codes.
- Use the “Read and Clear Faults” Process: Many Diagbox versions provide a two-step approach—first read the faults to confirm, then clear them. This prevents accidental erasure of important diagnostic information.
- Confirm Clearance via Pop-Up Windows: The software will prompt you to confirm the action. Approve the process to proceed.
- Turn Ignition Off and On as Instructed: After clearing, follow the software’s guidance to cycle the ignition. This ensures the ECUs reset correctly.
Notes on Common Software Interface Elements
- Bin/Trash Icon: Often represents the “Clear Faults” button; clicking it initiates the erasure process.
- Confirmation Dialogues: Always read the pop-up prompts carefully; they prevent accidental deletion of critical data.
7. Verifying Fault Clearance
Clearing faults isn’t the final step. Verification ensures the ECU reset was successful and that persistent issues aren’t hidden.
Step-by-Step Verification
- Run a Follow-Up Scan: After clearance, perform another full ECU scan to confirm that all previously detected faults have been erased.
- Check for Recurring Faults: If any fault reappears, it may indicate an underlying issue that requires repair rather than just clearing.
- Understand the Importance of Verification: Skipping this step can mask ongoing problems, leading to repeated errors or vehicle malfunctions.
Verification is your safety net—it confirms that clearing codes was effective and that your vehicle is in stable condition.
8. Important Safety and Practical Notes
While clearing faults can seem straightforward, it’s crucial to understand its limitations and best practices:
- Clearing faults does not repair the root cause: Erasing a fault code simply removes its record from the ECU; the underlying mechanical or electrical issue may still exist.
- Some faults may reappear: Persistent problems, such as failing sensors or wiring issues, will trigger the same fault codes again.
- Recommended usage: Only clear faults after addressing the underlying issue or confirming that the fault is non-critical. Avoid using clearance as a quick fix.
- Additional tips for safe and effective fault management:
- Document all fault codes before erasing them for future reference.
- Follow the software prompts carefully; don’t rush through clearance steps.
- Keep the vehicle in a safe and stationary position during the process.
- Document all fault codes before erasing them for future reference.
9. Resources & References
For hands-on guidance and deeper understanding, these resources provide practical demonstrations, manuals, and official documentation:
Step-by-Step Video Tutorials on YouTube
- How to clear faults using Diagbox (example tutorial):
https://www.youtube.com/watch?v=KjHqkBpE4jE - Full Diagbox diagnostic walkthrough for beginners:
https://www.youtube.com/watch?v=gcmtz9pFJx0
Official Diagbox Manuals & Software Resources
(These are official PSA-related resources and documentation pages.)
- PSA Service Box (official repair documentation, manuals, ECU diagrams):
https://service.citroen.com - Peugeot Service Box:
https://public.servicebox.peugeot.com - Official PSA Diagnostic Tools Page (general info):
https://www.psa-peugeot-citroen.com/en
Guides for Interpreting Fault Codes & Freeze Frame Data
- OBD-II Code Lookup (helpful for interpreting Diagbox codes):
https://www.obd-codes.com - Freeze Frame Data explanation:
https://www.obd-codes.com/faq/freeze-frame-data.php
Related Tutorials
- Which Diagbox version supports guided diagnostics (YouTube guide):
https://www.youtube.com/watch?v=qPpUDaEXO5k - Safety precautions before erasing ECU fault codes:
https://www.youtube.com/watch?v=3SQxyqTV3xY
10. Conclusion
Clearing ECU faults with Diagbox is a powerful diagnostic tool when used responsibly. To recap the process:
- Connect – Safely link Diagbox to your vehicle’s OBD-II port.
- Scan – Run a full ECU scan to detect all faults.
- Review – Examine fault codes, identify affected modules, and prioritize issues.
- Clear – Use the software’s fault management interface to erase non-critical codes safely.
- Verify – Run a follow-up scan to confirm that the clearance was successful.
By following these steps carefully, you can manage vehicle faults efficiently while ensuring that underlying issues are not overlooked. Use fault clearing as part of a responsible diagnostic workflow, and let Diagbox be your reliable partner in maintaining your vehicle’s health.
FAQ: Clearing Faults Using Diagbox
1. Can I clear all faults in my vehicle using Diagbox?
Diagbox allows you to clear most ECU-stored faults, but it cannot fix the underlying issues. Persistent or critical faults may reappear if the root problem isn’t addressed.
2. Is it safe to clear faults without repairing the vehicle?
It’s not recommended. Clearing faults without resolving the cause may hide ongoing issues and could compromise vehicle safety. Always prioritize addressing critical faults first.
3. Do I need any special tools to use Diagbox?
Yes, you’ll need a Diagbox diagnostic interface, a laptop or device with Diagbox installed, and a vehicle with an OBD-II port. Make sure your software is up-to-date.
4. How do I know if the fault clearance was successful?
After clearing faults, run a follow-up ECU scan. If no previous codes reappear, the clearance was successful. Any returning faults indicate an underlying issue that requires repair.
5. Can Diagbox detect faults for all car makes and models?
Diagbox is primarily designed for Peugeot, Citroën, and DS vehicles. For other car brands, different diagnostic software or tools may be required.


