

-
- No Comments
- August 8, 2026

How to make Cold Foam
Introduction: How to Make Cold Foam at Home
If you want to know how to make cold foam at home, the good news is that it is much easier than it looks. Cold foam is a light, airy topping made from cold milk that adds a creamy, frothy layer to drinks such as cold brew, iced coffee, and iced lattes. You do not need a complicated coffee setup or professional barista equipment to make it yourself.
The basic idea is simple: start with chilled milk, add a little sweetness or flavor if you like, then aerate it until it becomes thick and foamy. A handheld milk frother is one of the easiest ways to get the job done, but there are also simple alternatives if you do not have one.
In this guide, you will learn how to make cold foam from scratch, which type of milk works best, how to make it without a frother, and how to turn a basic foam into vanilla, caramel, or other flavored versions. Once you understand the basic technique, you can make a coffee shop style topping whenever you want.
What Is Cold Foam?

Cold foam is a frothy topping made by aerating cold milk until it becomes light, airy, and thick enough to sit on top of a cold drink. Unlike the foam used in hot cappuccinos and lattes, it is not made by steaming or heating the milk. That difference gives cold foam its distinctive texture and makes it especially suited to chilled beverages.
When you pour it over cold brew or iced coffee, the foam forms a soft layer across the surface instead of immediately mixing into the drink. As you sip, some of the foam gradually blends into the coffee, adding a creamy and lightly sweet finish without making the entire drink heavy.
Cold foam can be as simple as milk and vanilla syrup. For a lighter, more traditional style, skim milk is particularly useful because it creates plenty of airy bubbles when frothed. You can also experiment with different syrups and ingredients when you want a richer or more strongly flavored topping.
The result is a topping that feels creamy without necessarily being heavy, making it a natural match for cold brew, iced coffee, iced lattes, iced chai, and iced matcha.
Cold Foam vs Sweet Cream Cold Foam
Cold foam and sweet cream cold foam look similar when they land on top of your coffee, but they are not quite the same thing. The biggest difference comes down to the ingredients and the texture they create.
Regular cold foam is generally lighter and more airy. A simple version can use skim or nonfat milk with a little vanilla syrup. Once frothed, it develops plenty of small bubbles and a fluffy texture that sits lightly on top of cold coffee.
Sweet cream cold foam is richer because it uses ingredients such as heavy cream alongside milk and vanilla syrup. The additional fat gives it a thicker, smoother, and creamier mouthfeel compared with the lighter texture of regular cold foam.
Think of it this way: regular cold foam is light and frothy, while sweet cream cold foam is richer and more indulgent. Both can transform a simple iced coffee, but the better choice depends on the texture and richness you want in your drink.
If you prefer a delicate foam that adds sweetness without making your coffee feel heavy, start with regular cold foam. If you want something closer to a creamy dessert topping, sweet cream cold foam is the better direction.
What You Need to Make Cold Foam

One of the best things about cold foam is how little you need to get started. You do not need a kitchen full of gadgets or a long list of ingredients. With cold milk, a little sweetness, your favorite cold coffee, and a simple way to add air to the milk, you are ready to go.
The ingredients you choose will affect the final flavor and texture, so it is worth understanding what each one does before you start.
Milk
For a light and airy cold foam, skim or nonfat milk is a reliable choice. It might seem surprising that a lower fat milk can create such a fluffy topping, but it can foam beautifully and produces the tiny bubbles that give cold foam its signature texture. The supplied recipe research uses skim milk as the base for its simple two ingredient cold foam.
That does not mean you are locked into one type of milk. The milk you choose can change how the finished foam feels. A lighter milk tends to give you an airy, frothy result, while richer milk can move the texture in a creamier direction.
For the best results, start with milk that is properly chilled. Cold ingredients help keep the topping fresh and light while you work.
Vanilla Syrup or Sweetener
A little vanilla syrup can turn plain foamed milk into something much more interesting. It brings sweetness and a familiar vanilla flavor that pairs naturally with cold brew and iced coffee.
You can also use another flavored syrup if vanilla is not your thing. Caramel, hazelnut, or another favorite flavor can give the same basic foam a completely different personality. The supplied research confirms that flavored syrups can be swapped in according to your preference.
Keep the amount modest at first. You can always add more sweetness later, but too much syrup can overpower the coffee and change the consistency of the foam.
Cold Brew or Iced Coffee
Cold foam needs a cold drink underneath it. Cold brew is a natural match because its smooth, concentrated coffee flavor works well with a light, sweet topping, but you do not have to make cold brew from scratch.
Homemade or store bought cold brew works, as does regular iced coffee. You can even use an iced latte when you want something milkier. The important thing is that your coffee is cold and ready before you add the foam. The supplied competitor research specifically recommends cold brew, iced coffee, and iced lattes as ways to serve homemade cold foam.
Equipment
You have several ways to make cold foam, so do not let the lack of a particular gadget stop you. A handheld milk frother is one of the simplest options because it quickly adds air to the milk and gives you control over the texture. The supplied research identifies it as the easiest method for making cold foam.
If you do not own one, you still have plenty of choices. A French press can foam the milk through quick pumping motions. An immersion blender can aerate the mixture directly in a container, while a regular blender is useful when you want to prepare a larger amount.
For the simplest no equipment approach, grab a mason jar with a secure lid. Add the milk and syrup, close it tightly, and shake until the mixture becomes foamy. It takes a little more effort than using a frother, but it can still produce a satisfying homemade cold foam.
The key is not owning the fanciest equipment. It is creating enough air in the cold milk to give it that soft, fluffy texture that makes cold foam worth adding to your drink.
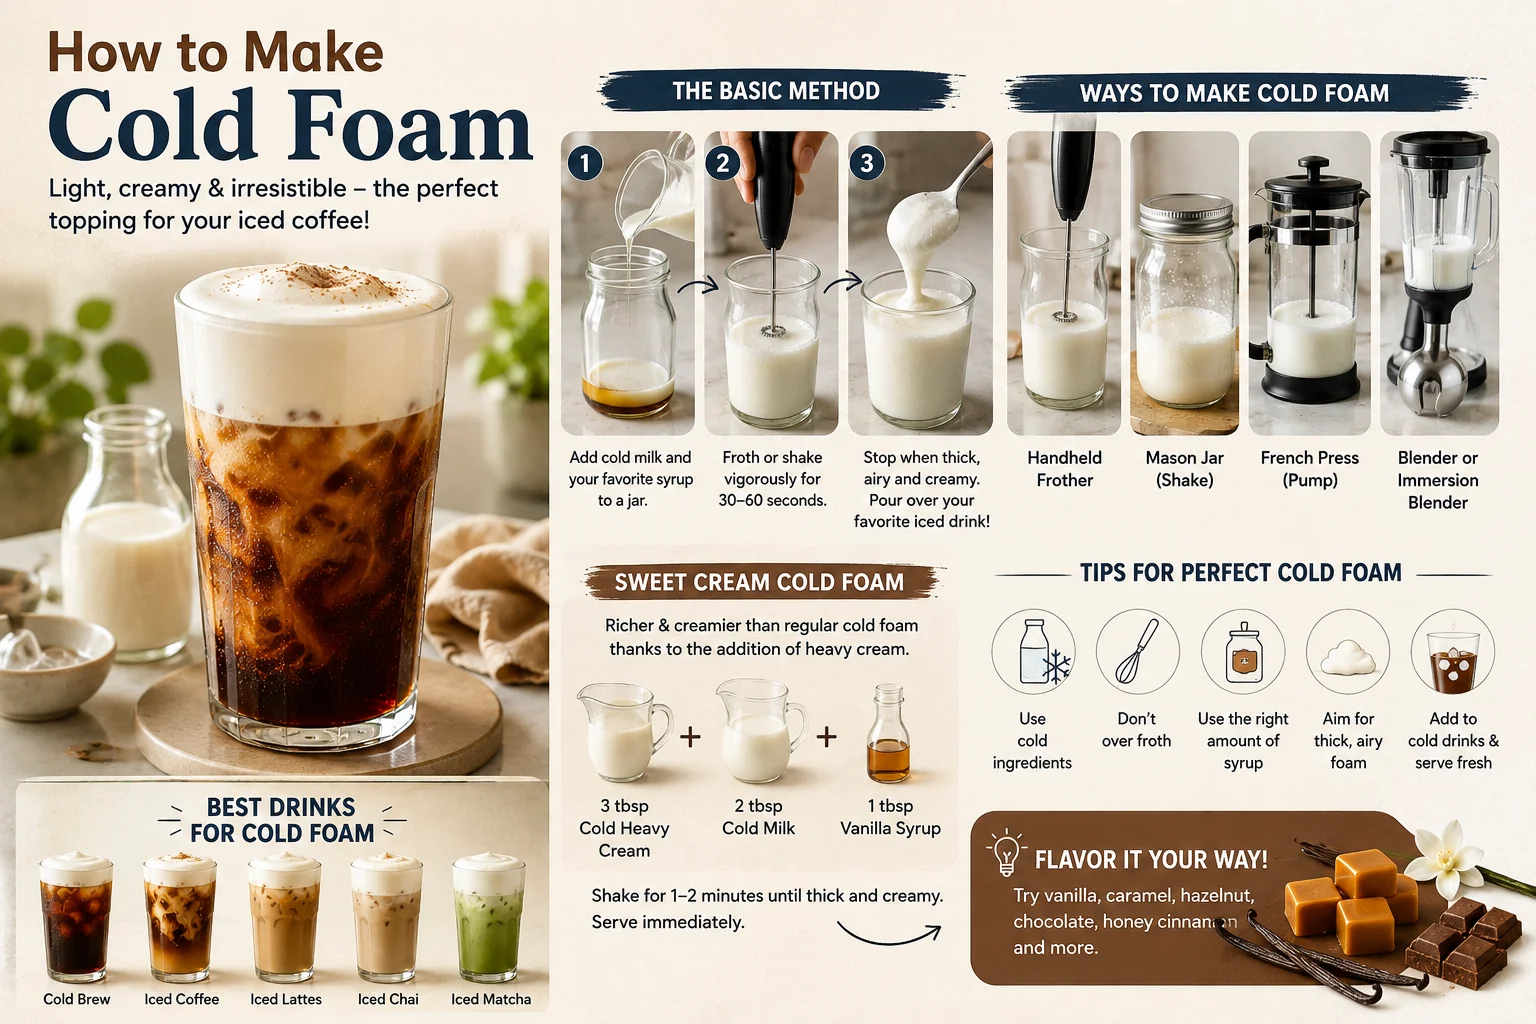
How to Make Cold Foam

Now for the part you came here for. Learning how to make cold foam at home is surprisingly straightforward. Once your milk is chilled and your coffee is ready, the whole process comes down to combining, frothing, and layering.
You are aiming for a foam that feels light and airy but still has enough body to sit neatly on top of your drink. Follow these five steps and you will have a homemade cold foam ready in minutes.
Step 1: Add the Cold Milk and Sweetener
Start with cold milk and pour it into a suitable glass, cup, or jar. Add your preferred amount of vanilla syrup for sweetness and flavor. If you are not using vanilla, you can substitute another flavored syrup or sweetener that works with your coffee.
Keep the mixture cold from the beginning. Chilled milk gives you the right starting point for a refreshing topping and helps maintain the character of the cold foam.
Do not fill your container too high. You need enough room for the milk to move and expand as air is incorporated during frothing.
Step 2: Froth the Milk
Place the handheld milk frother into the milk, keeping the whisk attachment below the surface so you do not create unnecessary splashing. Turn it on and begin frothing until the milk becomes visibly thicker, lighter, and full of small bubbles.
The supplied competitor recipe uses around 20 seconds as a reference point, but the texture matters more than watching the clock. Stop once the foam looks thick and stabilized rather than continuing simply to reach a particular time.
You want soft, airy foam that has enough structure to sit on top of the coffee. If it still looks like ordinary liquid milk, give it a little more time. If it becomes overly whipped or starts losing its smooth texture, you have gone too far.
Step 3: Prepare Your Cold Coffee
While your foam is ready, prepare the drink underneath it. Fill a glass with ice and pour in your cold brew or iced coffee.
You can sweeten the coffee if you prefer, particularly if you are using plain cold brew. Just remember that the cold foam itself can add sweetness, so you may not need as much sugar or syrup as you normally would.
Leave enough room at the top of the glass for a generous layer of foam. A little space makes it much easier to add the topping without spilling coffee over the sides.
Step 4: Add the Cold Foam
Now comes the satisfying part. Slowly pour the freshly frothed milk over the surface of your cold coffee.
Pour gently rather than dumping it in all at once. The goal is to let the foam settle across the top and create that distinct creamy layer instead of immediately mixing into the drink.
For a thicker topping, you can use a spoon to gently scoop the foam onto the coffee. This also gives you more control if you want a generous layer that sits visibly above the drink.
Step 5: Serve Immediately
Cold foam is at its best when it is freshly made. Once the milk has been aerated, its bubbles give it that light, fluffy texture, but the foam will not stay exactly the same forever.
For the best appearance and mouthfeel, add the foam to your drink and serve it straight away. The supplied competitor research similarly recommends serving sweet cream cold foam immediately rather than relying on storage for the same texture.
That fresh layer is part of what makes cold foam so enjoyable. You get the contrast between cold coffee underneath and a soft, airy topping above it, with the foam gradually blending into each sip as you drink.
How to Make Cold Foam Without a Frother
No milk frother? No problem. You can still make cold foam at home with a few everyday kitchen tools. The goal is the same with every method: introduce enough air into the cold milk to create a light, foamy texture.
A handheld frother is convenient, but it is not your only option. A French press, mason jar, immersion blender, or regular blender can all give you a way to make cold foam without buying another gadget.
How to Make Cold Foam With a French Press
A French press can double as a simple milk frother. Pour your cold milk and vanilla syrup into the bottom of the French press, making sure you do not fill it too high.
Place the lid and plunger on top, then use quick, short pumping movements to push the plunger up and down. Keep going until the milk becomes noticeably foamy and increases in volume.
This method works because the repeated movement incorporates air into the milk. Once you have a light layer of foam, carefully remove the lid and spoon or pour the foam over your iced coffee or cold brew. The competitor research specifically recommends quick, short pumps until the milk begins to foam.
How to Make Cold Foam With a Mason Jar
The mason jar method is about as simple as it gets. Add your cold milk and vanilla syrup to a clean jar, leaving some empty space so the liquid has room to move.
Secure the lid tightly and shake the jar vigorously. Keep shaking until the milk becomes visibly foamy and develops a thicker, airy texture.
This method takes more effort than using a powered frother, but it requires no special equipment. Once the foam is ready, remove the lid and add it directly to your cold brew or iced coffee. The supplied competitor research also recommends a tightly sealed mason jar as a basic alternative when a frother is unavailable.
How to Make Cold Foam With an Immersion Blender
An immersion blender gives you another quick way to aerate cold milk. Pour the milk and sweetener into a suitable glass or container, then place the blender head into the mixture.
Blend until the milk becomes visibly foamy and the foam has enough structure to hold its shape. Keep the blender head submerged while working to reduce splashing.
Once the mixture reaches the texture you want, stop blending and spoon or pour the foam onto your cold coffee. The competitor research presents an immersion blender as an alternative that can create stabilized, foamy cold milk.
How to Make Cold Foam With a Regular Blender
A regular blender makes the most sense when you want to prepare more cold foam at once. Add the cold milk and your chosen sweetener to the blender, then blend until the mixture becomes airy and increases in volume.
Because a blender can process a larger amount at once, it can be useful when you are preparing several iced coffees rather than making a single serving. Once the foam becomes sufficiently voluminous, pour it over your prepared drinks.
The supplied competitor research specifically lists a regular blender as an option for making a larger quantity of cold foam.
Whichever method you choose, the principle stays the same: cold milk plus air creates the foam. You do not need a dedicated frother to enjoy a fluffy topping on your next iced coffee.
What Milk Is Best for Cold Foam?
The best milk for cold foam depends on the texture you want in your drink. If you prefer a light, airy topping with plenty of tiny bubbles, skim or nonfat milk is a strong place to start. It can foam beautifully while keeping the finished topping delicate rather than heavy. The supplied competitor research uses skim milk as the base for its simple cold foam recipe.
Higher fat milk takes the foam in a different direction. Instead of producing a particularly light topping, richer milk can give you a creamier and more substantial mouthfeel. That can be useful when you want something closer to a dessert style coffee topping.
This is also where the difference between regular cold foam and sweet cream cold foam becomes easier to understand. Regular cold foam is generally lighter and more airy, while sweet cream cold foam combines ingredients such as heavy cream and milk for a thicker, richer texture.
So, if you want a fluffy topping that keeps your iced coffee feeling light, start with skim milk. If richness is more important to you, a higher fat milk or sweet cream style mixture may be a better fit.
How to Make Vanilla Cold Foam
Vanilla is one of the easiest ways to give homemade cold foam a familiar coffee shop style flavor. You do not need to completely change the basic recipe. Simply add vanilla syrup to your cold milk before frothing.
Start with chilled milk and add a small amount of vanilla syrup. Froth the mixture until it becomes light, airy, and thick enough to sit on top of your cold brew or iced coffee. The syrup adds sweetness and a clear vanilla flavor while keeping the foam relatively simple and light.
The amount of syrup is easy to adjust. Use less if you want the coffee flavor to remain the star, or add a little more when you want a sweeter vanilla topping. You can also use homemade or store bought vanilla syrup, depending on what you already have available.
The beauty of vanilla cold foam is its simplicity. A basic milk foam becomes a more polished topping with just one extra ingredient.
Cold Foam Flavor Ideas

Once you know how to make cold foam, changing the flavor is one of the easiest parts. Instead of vanilla syrup, use another flavor that complements the coffee or cold drink underneath it. The supplied research specifically notes that flavored syrups can be substituted for vanilla.
Vanilla Cold Foam
Keep it classic with vanilla syrup. It adds gentle sweetness and a familiar flavor without overwhelming the coffee.
Caramel Cold Foam
Add caramel syrup for a deeper, sweeter topping that works especially well with cold brew and iced coffee.
Salted Caramel Cold Foam
Combine caramel flavor with a small amount of salt for a sweet and slightly savory contrast.
Honey Cinnamon Cold Foam
Use honey for sweetness and add a little cinnamon for warmth and spice. This is an easy way to make your usual iced coffee feel a little different.
Chocolate Cold Foam
Chocolate flavor can turn a simple cold foam into something richer and more dessert like. Use a chocolate flavored syrup or another chocolate ingredient that blends smoothly into the milk.
Seasonal Cold Foam
Cold foam is easy to adapt to the season. Try pumpkin spice inspired flavors in autumn, peppermint during winter, or lighter fruit and floral flavors when you want something different in warmer months.
You do not need a complicated recipe for every variation. Start with the same cold foam base, change the flavoring, and adjust the sweetness until it suits your drink.
How to Make Sweet Cream Cold Foam
If regular cold foam is light and airy, sweet cream cold foam takes things in a richer direction. It has a thicker, smoother texture because it combines cold heavy cream with milk rather than relying on lighter milk alone.
For a simple single serving, the supplied recipe uses 3 tablespoons of cold heavy cream, 2 tablespoons of cold milk, and 1 tablespoon of vanilla syrup. These ingredients create a sweet, creamy mixture that can be transformed into a soft foam for topping coffee.
Add the cold heavy cream, milk, and vanilla syrup to a small jar with a secure lid. Close it tightly and shake vigorously for about 1 to 2 minutes, until the mixture becomes thicker while remaining soft and creamy.
Pour the finished sweet cream cold foam over your cold brew, iced coffee, or another chilled coffee drink and serve it immediately. The result should feel noticeably richer than regular cold foam without becoming stiff like whipped cream.
The key difference is the balance of richness and air. Regular cold foam gives you a lighter, more bubbly topping, while sweet cream cold foam brings a creamier texture and fuller flavor.
How to Get Thick, Stable Cold Foam
Getting the right texture is less about complicated technique and more about knowing when to stop. Start with cold ingredients, especially the milk or cream. Keeping everything chilled helps maintain the fresh, refreshing character you want from a cold topping.
As you froth, watch the texture rather than relying entirely on a timer. You want the mixture to become visibly thicker and airy, with enough structure to sit on top of your drink. Once it reaches that point, stop.
Overworking the mixture can work against you. The supplied competitor research warns that overwhipping cold foam can cause it to separate and develop an unpleasant texture.
A good rule is simple: froth until the foam looks thick and stable, then stop. You are creating cold foam, not trying to turn the milk into stiff whipped cream.
Common Cold Foam Mistakes
Cold foam is forgiving, but a few small mistakes can leave you with flat, watery, or overly thick foam. Here are the most common problems and the easiest fixes.
Using Warm Milk
The problem: Warm milk can make it harder to achieve the cool, airy texture you want.
The fix: Start with properly chilled milk straight from the refrigerator.
Over Frothing the Milk
The problem: Frothing for too long can make the foam overly thick or affect its smoothness.
The fix: Stop as soon as the milk becomes airy, thick, and stable.
Using Too Much Syrup
The problem: Too much syrup can make the foam excessively sweet and may affect its texture.
The fix: Start with a small amount and add more only if you need additional sweetness.
Making the Foam Too Thin
The problem: Thin foam disappears into the coffee instead of sitting neatly on top.
The fix: Continue aerating the milk briefly until it becomes visibly thicker and holds more air.
Making the Foam Too Thick
The problem: Overworked foam can lose the soft, creamy quality that makes cold foam different from whipped cream.
The fix: Stop frothing once you reach a light, stable consistency. Avoid trying to make it stiff.
Pouring It Onto a Warm Drink
The problem: Cold foam is designed for chilled beverages, so a warm drink defeats the contrast and can quickly affect the topping.
The fix: Prepare your cold brew or iced coffee over ice before adding the foam.
Waiting Too Long Before Serving
The problem: The airy structure of freshly made foam can weaken over time.
The fix: Add the foam to your drink and serve it soon after making it for the best texture and appearance. The supplied research also recommends serving sweet cream cold foam immediately.
What Drinks Can You Put Cold Foam On?
Cold foam does not belong to just one coffee recipe. Once you know how to make cold foam, you can use the same topping to give several cold drinks an extra layer of texture and flavor.
Cold Brew
Cold brew is one of the most natural pairings. Its smooth coffee flavor gives the light foam plenty of room to shine.
Iced Coffee
Pour cold foam over iced coffee when you want a simple everyday drink to feel a little more special.
Iced Lattes
Cold foam works beautifully over iced lattes, particularly when the foam carries a complementary flavor such as vanilla or caramel.
Iced Chai Lattes
You do not have to keep cold foam limited to coffee. An iced chai latte can benefit from the soft, sweet contrast of a foamy topping.
Iced Matcha
Cold foam can also add a creamy layer to iced matcha. Vanilla or another lightly sweet flavor can work particularly well with the earthy character of matcha.
The supplied competitor research specifically recommends cold brew, iced coffee, iced lattes, iced chai lattes, and iced matcha as drinks that pair well with homemade cold foam.
Can You Store Cold Foam?
Cold foam is best when it is freshly made. The airy structure that gives it that soft, cloudlike texture can weaken over time, which means stored foam may not have the same volume or consistency as freshly frothed foam.
This is particularly important if you are making regular cold foam for an iced coffee. The foam is meant to sit lightly on top of the drink, and those bubbles are part of what gives it its signature texture. Reader discussion in the supplied competitor material specifically raises the question of storing cold foam, with the response noting that the bubbles can disappear during storage.
For the best result, make the amount you need and use it soon after frothing. That way, you get the light texture and fresh appearance you were aiming for instead of relying on foam that has been sitting in the refrigerator.
Frequently Asked Questions About How to Make Cold Foam
Can you make cold foam without a frother?
Yes. A handheld frother is convenient, but it is not essential. You can use a French press with quick pumping movements, shake the milk in a tightly sealed mason jar, or use an immersion blender to aerate the mixture. A regular blender can also work when you want to make a larger quantity.
What milk is best for cold foam?
Skim or nonfat milk is a good choice when you want a light, airy foam with plenty of small bubbles. Higher fat milk can produce a richer, creamier result, especially when used as part of a sweet cream style mixture.
Can you make cold foam with regular milk?
Yes. Regular milk can be used to make homemade cold foam, although the final texture can vary depending on its fat content. Lighter milk tends to create a more airy foam, while richer milk can give you a creamier mouthfeel.
Can you flavor homemade cold foam?
Absolutely. Vanilla syrup is an easy starting point, but you can swap it for other flavored syrups to customize your foam. Caramel, hazelnut, chocolate, or another flavor can give the same basic milk foam a completely different character.
What drinks go best with cold foam?
Cold foam works particularly well with cold brew and iced coffee, but you can also add it to iced lattes, iced chai lattes, and iced matcha. These drinks all provide a chilled base that lets the foam sit on top as a separate creamy layer.
How long does homemade cold foam last?
For the best texture, homemade cold foam is better served fresh. Its airy bubbles can weaken over time, so stored foam may lose the light, fluffy consistency you get immediately after frothing. The supplied competitor material specifically notes that the bubbles can disappear when foam is stored.
Final Thoughts on How to Make Cold Foam
Learning how to make cold foam does not require a complicated recipe or professional coffee setup. Start with cold milk, add a little sweetness or flavor, and aerate it until you reach the light, stable texture you want.
From there, you can keep things simple with vanilla or experiment with caramel, chocolate, seasonal flavors, and richer sweet cream combinations. A handheld frother makes the process quick, but a French press, mason jar, immersion blender, or regular blender can also get the job done.
The best part is that you can make the foam your way. Choose the milk, flavor, and equipment that suit you, then add the freshly made topping to your favorite cold drink.
Check out our latest Blogs: https://eadoz.com/blog/.


