
-
- No Comments
- December 23, 2025
How to find and replace in Word
1. Introduction
Editing a long document in Microsoft Word can quickly turn into a tedious scroll-and-search nightmare. That’s where Find and Replace steps in. This built-in feature allows you to locate specific words, phrases, or elements in your document and replace them instantly no endless manual edits required.
For anyone working with long reports, blog posts, academic papers, or manuscripts, Find and Replace is not just helpful, it’s essential. Bloggers use it to update keywords, content creators rely on it to clean drafts, editors use it to maintain consistency, and students depend on it to fix repeated mistakes before submission.
The real power of Find and Replace lies in its flexibility. Microsoft Word offers basic options for quick text changes and advanced tools for handling formatting, special characters, and complex patterns. Mastering both levels can dramatically speed up your workflow and reduce human error.
2. What Is Find and Replace in Microsoft Word
Find and Replace is a powerful editing feature in Microsoft Word that allows users to search for specific content within a document and replace it with something else—automatically or selectively.
At its simplest, it can replace one word with another across an entire document. At its most advanced, it can modify text formatting, paragraph styles, tabs, line breaks, and special characters, all without touching each instance manually.
Compared to manual editing, Find and Replace saves hours of repetitive work. Instead of hunting through pages one by one, Word scans the entire document in seconds. This not only boosts productivity but also ensures consistency, especially in large files where missed edits are easy to overlook.
In short, Find and Replace turns Word from a basic text editor into a precision editing tool fast, accurate, and built for scale.
3. How to Open Find and Replace in Word
Before you can start editing efficiently, you need to know where to access the Find and Replace tool. Microsoft Word offers two simple ways to open it, both designed for speed and convenience.
3.1 Using the Home Tab
The most visual and beginner-friendly method is through the Word interface:
- Open your Word document
- Go to the Home tab
- Look for the Editing group on the right
- Click Replace
This opens the Find and Replace dialog box, where you can immediately begin searching and replacing text.
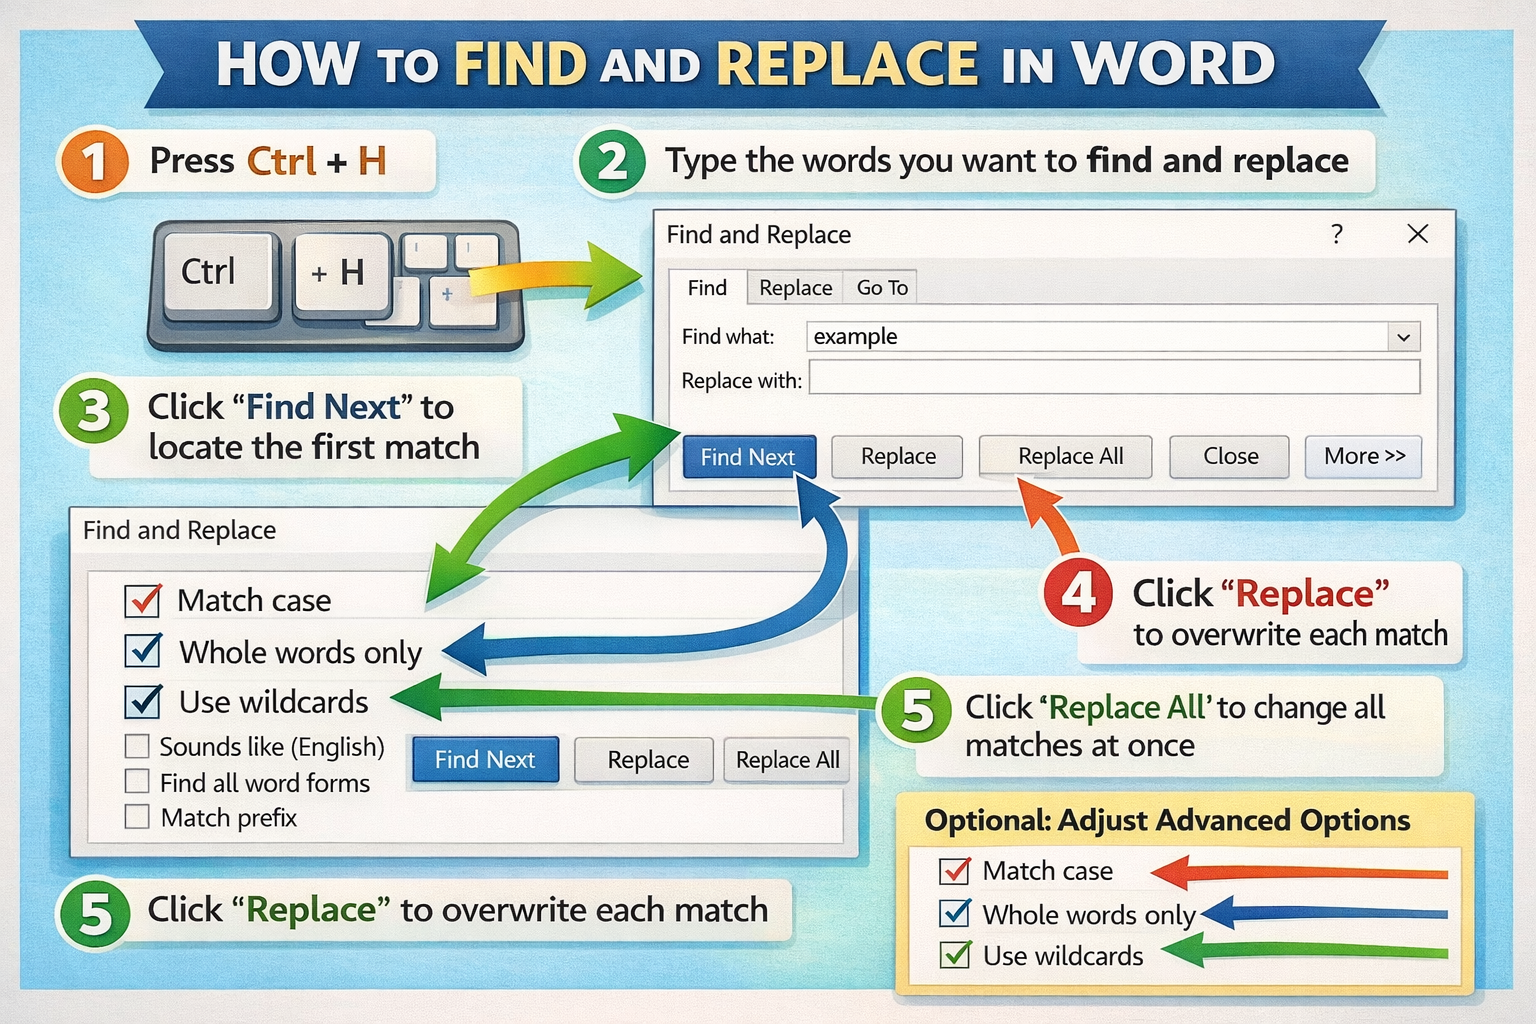
3.2 Using Keyboard Shortcut
For faster access, especially when working on large documents, use the keyboard shortcut:
- Ctrl + H (Windows)
This shortcut instantly opens the Replace tab without navigating menus. It’s the preferred method for experienced users because it saves time, reduces clicks, and keeps your editing flow uninterrupted.
4. Basic Find and Replace Steps in Word
Once the Find and Replace window is open, the process itself is straightforward. Understanding each option ensures you make accurate changes without unintended edits.
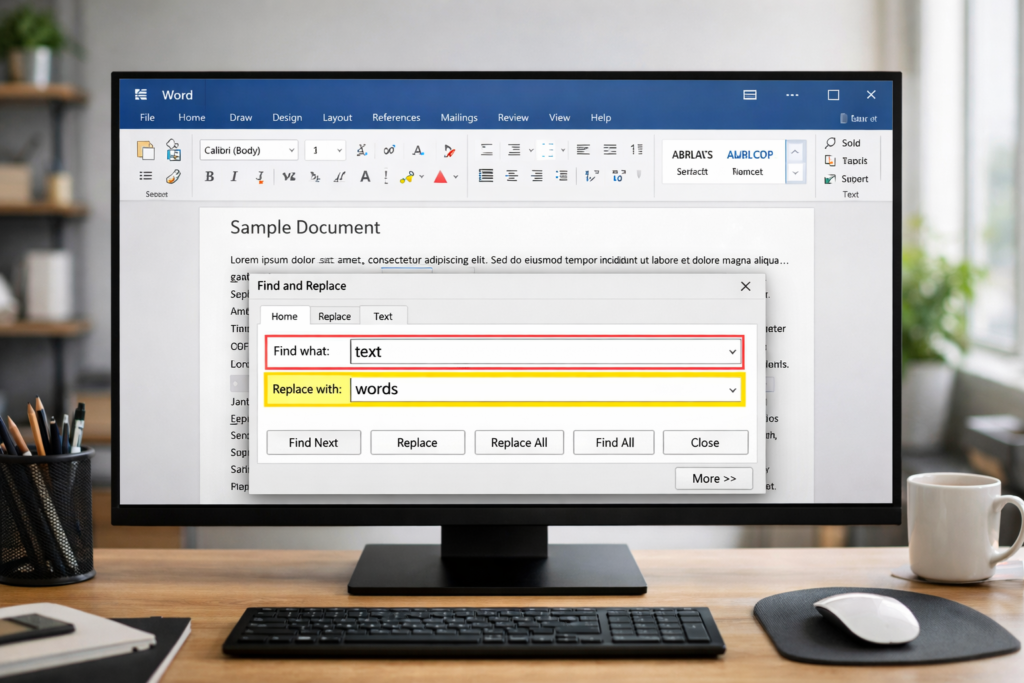
4.1 Understanding the Find and Replace Dialog Box
The dialog box contains two main fields:
- Find what: Enter the word, phrase, or element you want Word to locate
- Replace with: Enter the new text you want to substitute in its place
Word scans the entire document based on what you enter in these fields.
4.2 Replace Options Explained
Below the text fields, you’ll see three primary action buttons:
- Find Next: Highlights the next occurrence without making changes
- Replace: Replaces the currently highlighted instance and moves to the next
- Replace All: Replaces every matching instance throughout the document in one action
Each option serves a different editing purpose.
4.3 When to Use Each Option
Choosing the right option is key to avoiding mistakes:
- Use Find Next and Replace when you want to review changes one by one
- Use Replace All for bulk changes when you’re confident every match should be replaced
For important documents, it’s best to review replacements individually first. This prevents accidental changes, especially when similar words or phrases appear in different contexts.
5. Advanced Find and Replace Options in Word
The true power of Find and Replace lives beyond basic text swapping. Microsoft Word’s advanced options allow you to control how matches are found, making your edits smarter, safer, and more precise.
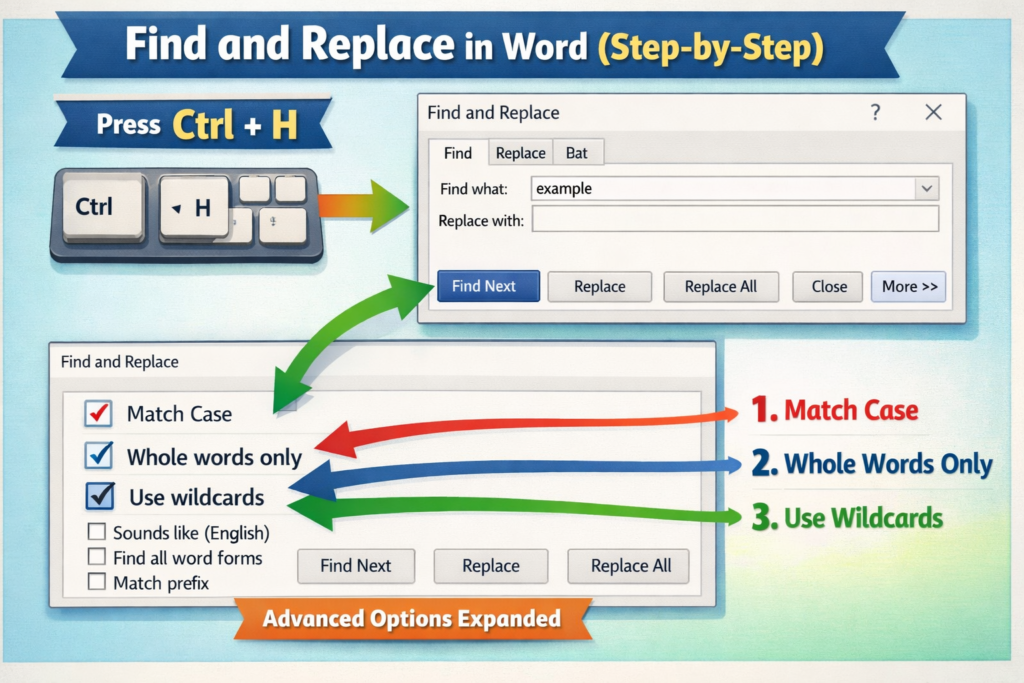
5.1 Accessing Advanced Options (More >>)
In the Find and Replace dialog box, click More >> at the bottom.
This expands the advanced menu, revealing additional checkboxes and buttons for refined searches, formatting controls, and special character handling.
5.2 Match Case
Match Case ensures Word only finds text that matches the exact capitalization you specify.
- Searching for “Word” will not match “word” or “WORD”
- Useful for proper nouns, brand names, headings, or acronyms
This option is essential when capitalization affects meaning or professionalism.
5.3 Find Whole Words Only
This option tells Word to match complete words rather than partial strings.
- Searching for “cat” will match “cat”
- It will not match “category” or “educate”
It’s especially helpful when replacing short words that may appear inside longer ones, preventing unintended edits.
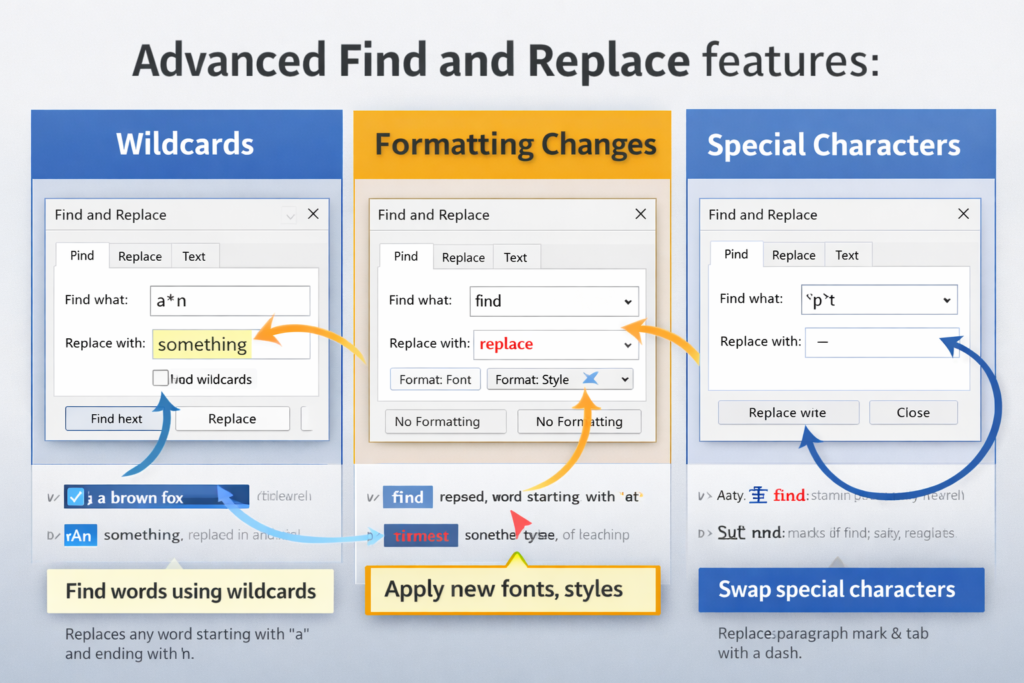
5.4 Use Wildcards
Wildcards allow flexible and pattern-based searching instead of exact matches.
- They act as placeholders for unknown or variable text
- Ideal for cleaning inconsistent formatting or locating patterns
Wildcards transform Find and Replace from a simple tool into a powerful text-matching engine.
5.5 Finding Formatting
Find and Replace isn’t limited to words—you can target formatting too.
- Fonts: size, color, bold, italics
- Styles: headings, body text, custom styles
- Paragraph formatting: alignment, spacing, indentation
This is perfect for standardizing documents without rewriting content.
5.6 Finding Special Characters
Word can also locate non-visible characters:
- Tabs for spacing cleanup
- Line breaks for layout fixes
- Em dashes and other symbols
These searches are crucial when working with copied content or complex layouts.
6. Using Wildcards in Find and Replace (Deep Dive)
Wildcards deserve their own spotlight. When used correctly, they enable advanced edits that would otherwise require manual rewriting.
6.1 Enabling Wildcards
To use wildcards:
- Open Find and Replace
- Click More >>
- Check Use wildcards
Once enabled, Word interprets special symbols as pattern instructions instead of literal characters.
6.2 Common Wildcard Symbols
Some of the most commonly used wildcard symbols include:
- ? — matches a single character
- * — matches a string of characters
- < > — defines word boundaries (start and end of a word)
These symbols allow you to search flexibly without knowing the exact text.
6.3 Practical Wildcard Examples
Wildcards shine in real-world editing scenarios:
- Prefix and suffix searches to find words starting or ending a certain way
- Reordering names using capture groups (e.g., last name first → first name first)
- Pattern-based replacements for inconsistent data or formatting
They are invaluable for advanced cleanup and structural edits.
6.4 Sounds Like and Word Forms
Beyond wildcards, Word offers intelligent matching options:
- Sounds Like finds words that sound similar, useful for phonetic variations
- Find all word forms captures plurals and verb tense variations
These features are especially helpful in English-language documents where word forms change frequently.
7. Using the Navigation Pane for Find and Replace
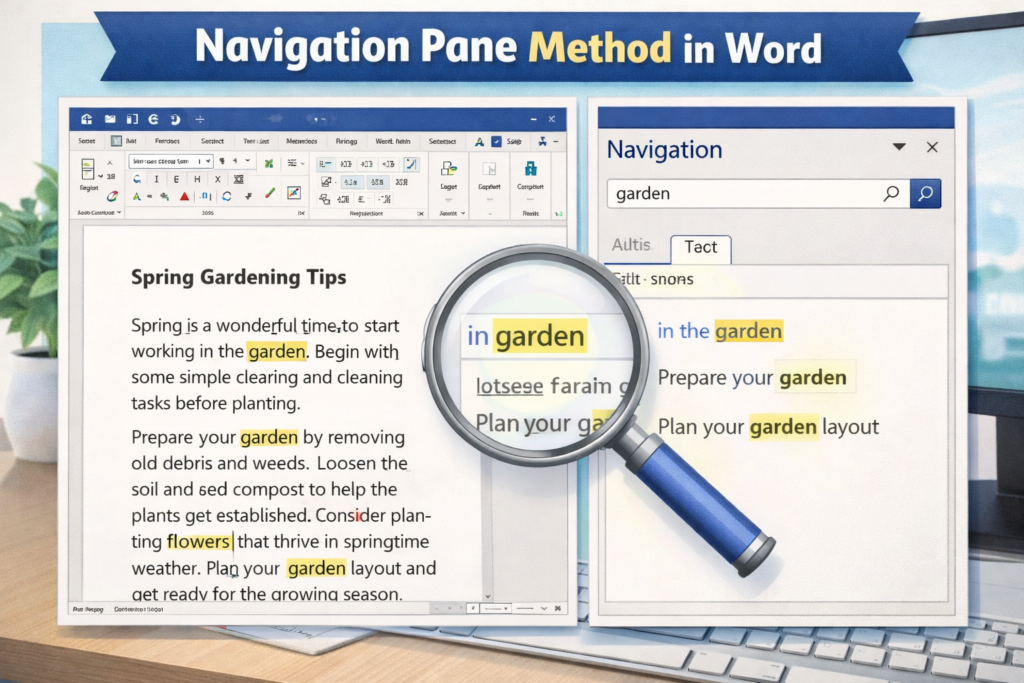
For users who prefer a visual, context-aware approach, the Navigation Pane in Word offers a sidebar method for finding and replacing text without relying solely on the dialog box.
7.1 Opening the Navigation Pane
To enable the Navigation Pane:
- Go to View → check Navigation Pane
- A sidebar will appear, displaying your document’s headings and a search magnifier
This is your central hub for contextual searches.
7.2 Searching from the Sidebar
The Navigation Pane highlights matches directly within your document.
- Click the magnifier icon and type your search term
- Word visually shows every occurrence in the sidebar and in-line in the document
- Allows you to review matches before replacing
This method is ideal for seeing the word in context, avoiding mistakes when similar terms appear.
7.3 Accessing Advanced Find & Replace from Navigation Pane
For deeper edits:
- In the Navigation Pane, click Settings → Advanced Find & Replace
- This opens the familiar dialog box but keeps the sidebar visible
You can now perform complex searches and replacements while still tracking where matches appear in your document.
7.4 When This Method Works Best
The Navigation Pane approach is particularly useful when:
- You want to review matches before replacing
- You’re editing formatting, styles, or special characters
- The document is long, and context matters
It combines speed with accuracy, giving you a clear visual guide through your content.
8. Common Use Cases for Find and Replace
Find and Replace is not just a tool it’s a time-saving powerhouse for a variety of tasks:
- Updating repeated words or names: Quickly replace a product name, author, or client reference throughout a document
- Fixing formatting inconsistencies: Standardize fonts, styles, headings, or paragraph spacing
- Cleaning imported content: Remove unwanted tabs, line breaks, or symbols from external files
- Editing long blog posts or manuscripts: Make global text adjustments without manually scrolling page by page
Mastering Find and Replace ensures your documents are consistent, professional, and polished, no matter the size or complexity.
9. Best Practices and Safety Tips
Even with the most powerful tools, careful usage is key. Follow these best practices to ensure Find and Replace works effectively without introducing errors:
- Always review before using Replace All: Large-scale replacements can unintentionally alter similar words or phrases. Checking individual matches first prevents mistakes.
- Use advanced options to avoid mistakes: Match Case, Whole Words Only, and wildcards give you control over exactly what Word changes.
- Test replacements on small sections first: Before applying changes across a large document, test your settings on a sample paragraph or page. This builds confidence and prevents unintended edits.
Following these tips keeps your documents accurate, consistent, and professional.
10. Helpful Resources and Official Guides
10.1 Microsoft Official Documentation
- Find guide: Microsoft Find and Replace Guide
- Replace guide: Microsoft Replace Text Guide
10.2 Third-Party Tutorials
- GeeksforGeeks advanced guide: Advanced Find and Replace in Word
These guides provide step-by-step instructions, visuals, and deeper explanations for advanced editing techniques.
11. Related Tutorials and Further Reading
To expand your skills and explore specialized techniques, check out:
- Step-by-step screenshots for Find and Replace in Word — Microsoft Screenshots Guide
- Wildcard pattern examples — GeeksforGeeks Wildcards
- How to replace formatting only in Word — Microsoft Replace Formatting Guide
- Replacing special characters like tabs and line breaks — Microsoft Special Characters Guide
- Batch find and replace across multiple Word documents tutorial — GeeksforGeeks Batch Replace
12. Conclusion
Microsoft Word’s Find and Replace is more than a simple shortcut it’s a versatile productivity tool that can save hours of editing.
From basic replacements for quick fixes to advanced options that handle formatting, wildcards, and special characters, mastering these features ensures accuracy, consistency, and efficiency in any document.
By using Find and Replace wisely, reviewing changes, and leveraging advanced features, you transform Word into a precision editing assistant, capable of handling even the most complex writing tasks.
Frequently Asked Questions (FAQ)
1. What is the difference between “Replace” and “Replace All” in Word?
- Replace changes only the currently highlighted instance of a word or phrase, letting you review each match individually.
- Replace All updates every occurrence across the document in one click, which is faster but requires caution to avoid unintended replacements.
2. Can I use Find and Replace to change formatting only?
- Yes! Word’s advanced options allow you to search for fonts, styles, and paragraph formatting without altering the text itself. Simply click More >> → Format in the dialog box.
3. How do wildcards work in Find and Replace?
- Wildcards are symbols that represent unknown text or patterns. For example, * matches any string of characters, ? matches a single character, and < > define word boundaries. They are powerful for complex searches and batch replacements.
4. Is there a way to review matches before replacing them?
- Absolutely. Using Find Next in the dialog box or the Navigation Pane highlights matches in context, allowing you to confirm changes before replacing text.
5. Can Find and Replace handle special characters like tabs or line breaks?
- Yes! Word lets you search for and replace tabs, line breaks, em dashes, and other special characters via the Special button in the advanced Find and Replace options. This is especially useful for cleaning up imported content.


