

-
- No Comments
- December 30, 2025
How to remove ole object in AutoCAD
Introduction
If you’ve ever tried deleting an Excel sheet or Word table inside an AutoCAD drawing and found it strangely untouchable, you’ve already met the frustration of OLE objects. These objects often refuse to select, won’t respond to the ERASE command, or seem to disappear until they suddenly block edits. The problem isn’t you it’s how AutoCAD handles Object Linking and Embedding behind the scenes.
OLE objects become difficult to delete mainly because their frames are hidden, they sit on locked layers, or they’re embedded in ways that limit direct interaction. In some cases, overlapping geometry or outdated drawing data makes selection nearly impossible, even though the object is clearly there. AutoCAD protects these objects more aggressively than native elements, which is why standard deletion doesn’t always work.
This guide walks you through a clear, step-by-step process to fix those exact issues. You’ll learn how to make OLE objects visible, unlock the layers they live on, select them correctly, and safely remove them without damaging the rest of your drawing.
What Is an OLE Object in AutoCAD
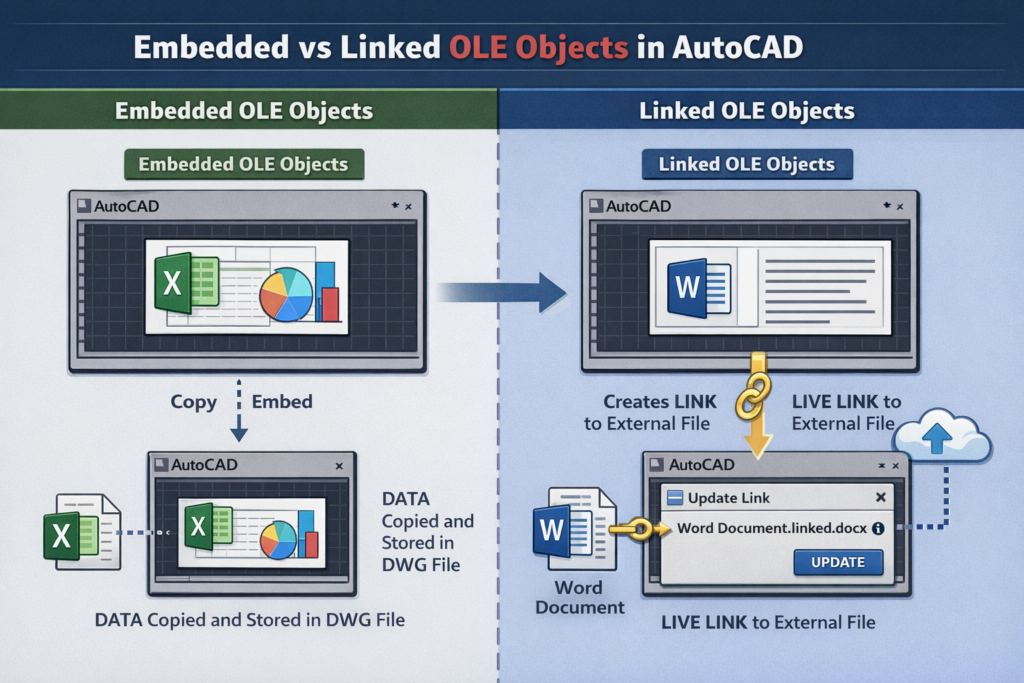
OLE stands for Object Linking and Embedding, a technology that allows AutoCAD to insert content created in other programs directly into a drawing. Instead of redrawing data manually, OLE lets you bring external information into AutoCAD while preserving its original format and structure.
Common OLE objects include Microsoft Excel spreadsheets, Word documents, charts, tables, and other external files placed inside a DWG file. These are often used for schedules, calculations, notes, or reference data that need to remain visually consistent with their source application.
There are two main types of OLE objects in AutoCAD: embedded and linked. Embedded OLE objects store a full copy of the external file inside the drawing itself, increasing file size but allowing the object to exist independently. Linked OLE objects, on the other hand, maintain a connection to the original source file, updating automatically when the source changes but becoming problematic if that link breaks or becomes inaccessible.
Why OLE Objects Can’t Be Deleted in AutoCAD
When an OLE object refuses to delete, it’s usually not because the file is corrupt, but because AutoCAD is preventing direct interaction in subtle ways. These objects behave differently from native geometry, and a few common conditions can make them feel completely “stuck.”
Hidden OLE frames are one of the most frequent causes. When OLE frames are turned off, the object has no visible boundary or grips, making it nearly impossible to select. The object is still there, but without a frame, AutoCAD offers no clear way to interact with it using standard selection tools.
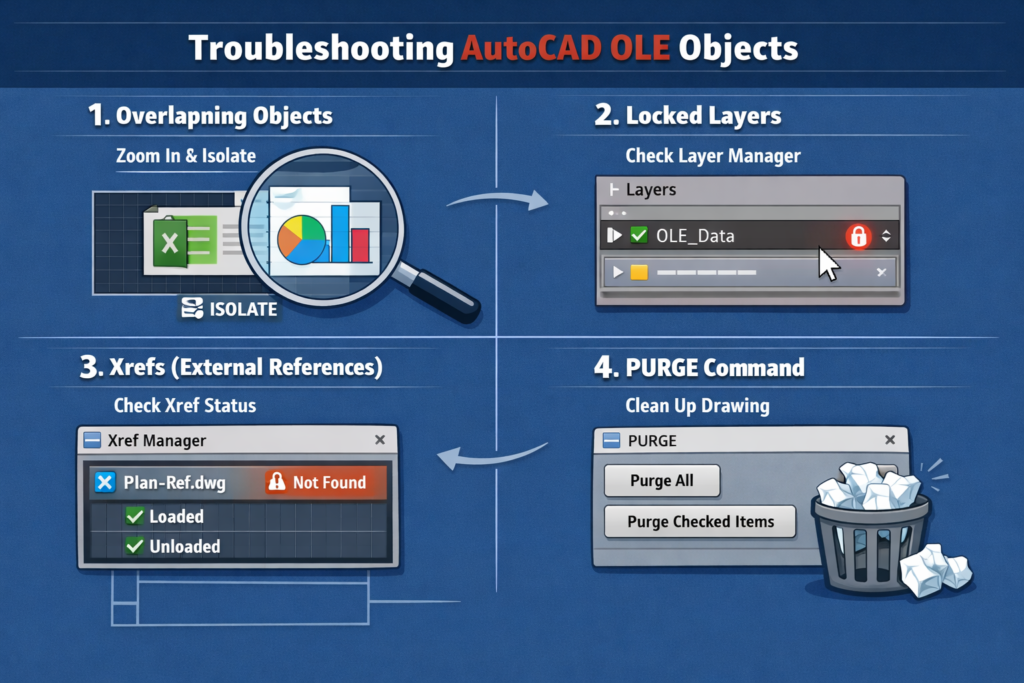
Locked layers are another major roadblock. If the OLE object exists on a locked layer, AutoCAD will not allow it to be erased, moved, or modified. This often happens in shared drawings where layers are locked to prevent accidental edits, causing embedded OLE content to appear undeletable.
Overlapping or masked objects can also interfere with selection. Dense geometry, hatches, wipeouts, or blocks layered over the OLE object may capture clicks instead, preventing AutoCAD from recognizing the OLE object beneath. This makes deletion attempts fail even though the object is visible.
Version-related limitations come into play when OLE objects were created in older versions of AutoCAD or inserted from external software that no longer integrates cleanly. In these cases, selection data may not behave as expected, requiring cleanup commands before deletion becomes possible.
External references (Xrefs) can completely block deletion if the OLE object belongs to a referenced file rather than the current drawing. Since Xref content cannot be directly edited in the host drawing, the OLE object must be removed from the source file itself before it disappears from the main drawing.
Step-by-Step: How to Remove OLE Object in AutoCAD
Removing an OLE object becomes straightforward once you make it selectable and remove the restrictions around it. Follow these steps in order to avoid accidental data loss and unnecessary trial and error.
Step 1: Check and Unlock the Layer
Before attempting to delete anything, confirm that the OLE object isn’t sitting on a locked layer. Locked layers prevent all edits, including deletion.
To identify the layer, hover over or select the OLE object if possible and check the layer name in the Properties panel. If the object isn’t selectable yet, open the Layer Properties Manager by typing LAYER and pressing Enter. Scan through the layer list and look for locked layers that may contain external or annotation content.
Once you find the correct layer, click the lock icon to unlock it. With the layer unlocked, AutoCAD allows full interaction with the OLE object, including selection and erasing.
Step 2: Enable OLE Frame Visibility
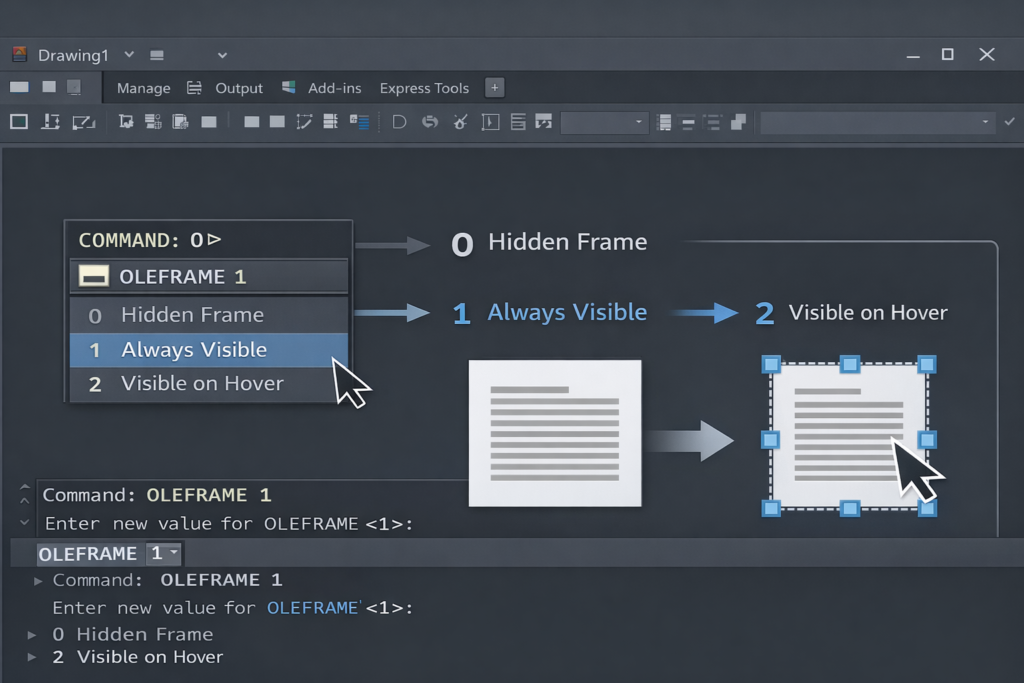
OLE objects can’t be selected if their frames are hidden, which is why enabling frame visibility is critical.
Type OLEFRAME in the command line and press Enter. AutoCAD will prompt you to enter a value. Each value controls how OLE frames behave:
- OLEFRAME = 0
Frames are hidden and not selectable. Use this only after cleanup is complete. - OLEFRAME = 1
Frames are always visible and selectable. This is the best option when you need to edit or delete OLE objects. - OLEFRAME = 2
Frames appear only when you hover over or select the object. Useful when you want visibility without clutter.
For deletion, set OLEFRAME to 1 to ensure the object’s boundary and grips are clearly visible.
Step 3: Select the OLE Object Properly
Once frames are visible, click directly on the OLE frame to select it. You should see grips appear around the object, confirming it’s active.
If direct clicking doesn’t work, use selection windows such as crossing windows to capture the entire frame. For crowded drawings, temporarily isolate the area using zoom tools or object isolation so overlapping geometry doesn’t interfere with selection.
In cases where other objects sit on top of the OLE object, isolate surrounding objects or hide layers temporarily to ensure the OLE frame receives the selection input.
Step 4: Erase the OLE Object
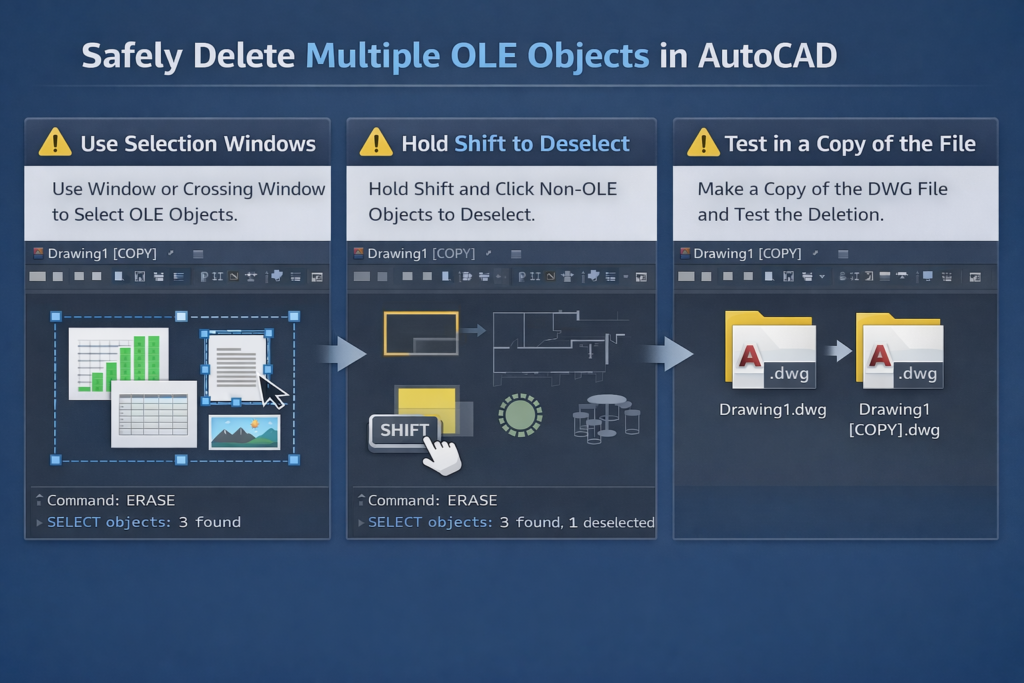
With the OLE object selected, type ERASE and press Enter, then confirm the deletion. This works for single OLE objects and is the safest approach.
For multiple OLE objects, you can select all visible OLE frames at once and erase them together. If using ERASE ALL, proceed carefully and hold Shift to deselect any non-OLE items before confirming, ensuring only the intended objects are removed.
After deletion, consider resetting OLEFRAME to its original value to keep your drawing clean and uncluttered.
Troubleshooting When OLE Objects Still Won’t Delete
If the OLE object still refuses to disappear after following the standard steps, the issue is usually related to selection interference, file structure, or legacy data. These checks help isolate and resolve stubborn cases without damaging the drawing.
Using ZOOM and ISOLATEOBJECTS can immediately clarify what’s blocking selection. Zoom tightly around the suspected OLE object to avoid clicking surrounding geometry by mistake. If the object becomes selectable, isolate it using object isolation so only the OLE object remains visible, making deletion far more reliable.
Checking for Xrefs is critical when nothing seems to work. If the OLE object is part of an externally referenced drawing, it cannot be deleted from the host file. Open the Xref Manager to confirm whether the object belongs to a referenced file, then edit and remove it directly from the source drawing instead.
Purging unused data with the PURGE command can resolve cases where legacy or corrupted OLE data blocks deletion. Running PURGE cleans out unused definitions and references that may interfere with object behavior, especially in older or heavily edited drawings.
Working with older AutoCAD versions can introduce compatibility issues. OLE objects created in earlier releases or imported from outdated software may not behave normally. In these cases, purging the drawing, saving it to a newer format, or reopening it in a newer AutoCAD version often restores proper control.
Why testing in a copy of the file matters comes down to safety. OLE removal can affect linked data, annotations, or embedded information. Always test deletion steps on a duplicate file to ensure nothing critical is lost or unintentionally altered.
Advanced OLE Removal Scenarios
Some OLE objects require extra care, especially when links or conversions are involved. These advanced scenarios help you clean up drawings without breaking workflows.
Removing linked Excel OLE objects without breaking the link requires verifying whether the object is embedded or linked before deletion. If the link must be preserved elsewhere, confirm the source file location and update or detach the link intentionally rather than force-deleting the object. This prevents broken references in other drawings or documentation.
Converting OLE objects to native AutoCAD objects before deleting is useful when the content needs to be retained temporarily. By converting tables or data into AutoCAD-native geometry, you gain full control over selection and editing. Once converted and verified, the original OLE object can be safely removed without risking data loss or instability in the drawing.
Common Mistakes to Avoid When Deleting OLE Objects
Even experienced AutoCAD users can run into trouble when removing OLE objects if a few key details are overlooked. Avoiding these common mistakes can save time, prevent data loss, and reduce unnecessary frustration.
Deleting without enabling OLE frames is one of the most frequent errors. When frames are hidden, the OLE object may appear impossible to select, leading users to assume it’s corrupted or undeletable. Always make OLE frames visible before attempting deletion so you can clearly see and select the object’s boundaries.
Forgetting locked layers can silently block every deletion attempt. If the layer containing the OLE object is locked, AutoCAD won’t allow any edits, no matter how many times you try to erase it. Checking and unlocking layers first ensures the software isn’t restricting access behind the scenes.
Editing original files without backups is a risk that’s easy to underestimate. OLE objects often contain linked or embedded data that may be difficult to recover once removed. Working on a copy of the drawing gives you the freedom to troubleshoot, test commands, and undo mistakes without jeopardizing critical project files.
Related Guides and Tutorials
These guides expand on common OLE-related problems and walk through solutions in more focused, task-based detail.
Step-by-step commands to delete OLE frames in AutoCAD
– Learn exactly how to enable OLE frames, select them correctly, and remove embedded objects safely.
🔗 https://www.canadacad.ca/how-to-remove-ole-object-in-autocad/
How to unlock layers containing OLE objects
– Covers identifying locked layers and restoring edit access when OLE objects can’t be selected or erased.
🔗 https://skillamplifier.wordpress.com/2019/11/12/ole-cannot-be-deleted-in-autocad-cant-move-delete-ole-objects/
How to toggle OLEFRAME and what each value means
– Official Autodesk-backed explanations of OLEFRAME behavior and visibility issues.
🔗 https://www.autodesk.com/support/technical/article/caas/sfdcarticles/sfdcarticles/Embedded-OLE-cannot-be-deleted.html
How to safely remove linked OLE files
– Community-tested solutions for removing linked Excel or Word OLE objects without breaking references.
🔗 https://forums.autodesk.com/t5/autocad-plant-3d-forum/ole-object-made-with-word-excel-unselectable-deleteable-movable/td-p/85493
Converting OLE to native AutoCAD elements
– Tutorials and forum discussions on converting OLE data into AutoCAD-native objects before cleanup.
🔗 https://www.canadacad.ca/how-to-remove-ole-object-in-autocad/
Trusted Resources and References
For deeper technical insight and real-world problem-solving, these trusted sources provide authoritative guidance on OLE behavior in AutoCAD:
Autodesk Support – Official Autodesk article on OLE deletion issues:
🔗 https://www.autodesk.com/support/technical/article/caas/sfdcarticles/sfdcarticles/Embedded-OLE-cannot-be-deleted.html
Skill Amplifier Guide – Practical explanation if OLE cannot be moved, deleted, or selected:
🔗 https://skillamplifier.wordpress.com/2019/11/12/ole-cannot-be-deleted-in-autocad-cant-move-delete-ole-objects/
CanadaCAD Tutorial – Step-by-step tutorial for removing OLE objects:
🔗 https://www.canadacad.ca/how-to-remove-ole-object-in-autocad/
Autodesk Forums – Community discussion with tips and fixes:
🔗 https://forums.autodesk.com/t5/autocad-plant-3d-forum/ole-object-made-with-word-excel-unselectable-deleteable-movable/td-p/85493
Final Thoughts
Removing OLE objects in AutoCAD doesn’t require guesswork when the right process is followed. The safest approach is to unlock the correct layer, enable OLE frame visibility, select the object cleanly, and delete it using standard erase commands.
Following the steps in order minimizes errors and prevents accidental damage to surrounding geometry or linked data. Skipping steps often leads to the same frustration that made the OLE object seem undeletable in the first place.
With consistent prevention habits such as managing layers carefully, keeping OLE frames under control, and maintaining clean drafting practices OLE objects become manageable tools rather than persistent obstacles in your workflow.
FAQ: Removing OLE Objects in AutoCAD
1. What is an OLE object in AutoCAD?
An OLE (Object Linking and Embedding) object is content imported from external programs like Excel or Word into AutoCAD. It can be either embedded (fully contained in the drawing) or linked (updates with changes in the source file).
2. Why can’t I delete an OLE object in AutoCAD?
OLE objects may be difficult to delete due to hidden frames, locked layers, overlapping objects, version compatibility issues, or if the object is part of an external reference (Xref).
3. How do I make an OLE object selectable for deletion?
Enable visibility of OLE frames using the OLEFRAME command, unlock the layer containing the object, and use grips or selection windows to highlight the object before erasing.
4. Can I remove linked Excel OLE objects without breaking the link?
Yes. You must carefully detach or remove the object while preserving the source file. Editing in a copy of the drawing is recommended to prevent accidental link breaks.
5. What is the safest way to delete multiple OLE objects in AutoCAD?
Select all visible OLE frames using selection windows, then use the ERASE command. If using ERASE ALL, hold Shift to deselect non-OLE objects to avoid deleting unintended elements.


