
-
- No Comments
- January 26, 2026
How to find duplicates in Google Sheets
1. Introduction
Duplicate data is one of those quiet problems that slowly wrecks your Google Sheets. At first, it looks harmless a repeated name here, a copied value there. But zoom out, and suddenly your totals are off, reports don’t match, and decisions are being made on shaky numbers. Whether you’re managing leads, tracking sales, or cleaning survey data, duplicates turn clarity into confusion fast.
This guide is here to fix that properly. You’ll learn how to find, highlight, count, and remove duplicates in Google Sheets without breaking your data or accidentally deleting something important. No guesswork. No messy workarounds.
We’ll walk through a quick overview of the main approaches Google Sheets offers: built-in cleanup tools, conditional formatting for visual checks, formulas for precise control, and smarter methods for analyzing duplicates instead of blindly deleting them. Different problems need different tools and this guide shows you exactly when to use each one.
2. Understanding Duplicates in Google Sheets
Before you start deleting anything, it’s crucial to understand what a “duplicate” actually means in Google Sheets because it’s not always as obvious as it sounds.
A duplicate can be any repeated value or combination of values, depending on how your data is structured. Sometimes it’s a single repeated email address. Other times, it’s an entire row that looks identical at first glance but isn’t meant to be removed.
Single-column duplicates happen when the same value appears more than once in one column like repeated names, phone numbers, or IDs. These are the easiest to spot and fix.
Multi-column duplicates occur when a combination of columns repeats. For example, a first name might appear multiple times, but the duplicate only matters when the first name and last name match together.
Full-row duplicates mean every cell in a row is identical to another row. These often show up after imports, form submissions, or copy-paste errors.
The final and most important question is intent.
Sometimes you want to remove duplicates permanently to clean a list or prepare data for analysis. Other times, you only want to identify duplicates so you can review them manually, keep the first entry, or investigate why they exist in the first place.
Knowing the difference between spotting duplicates and deleting them is what separates clean data from accidental data loss and everything that follows in this guide builds on that foundation.
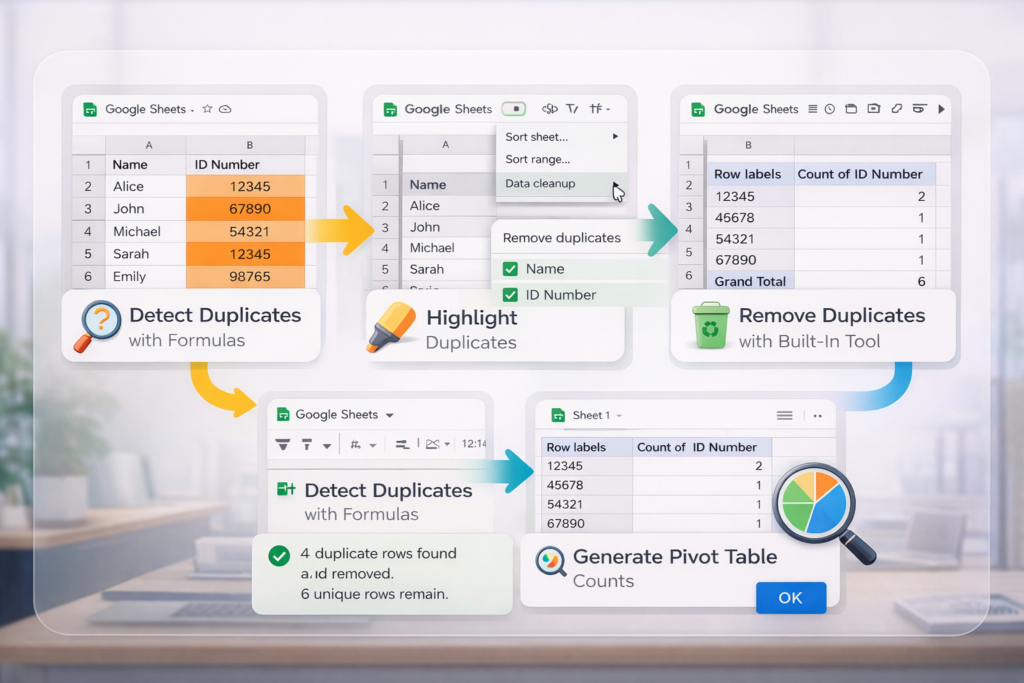
3. Method 1: Using the Built-in Remove Duplicates Tool
If you want the fastest possible cleanup with zero formulas, this is Google Sheets’ most direct option. The Remove duplicates tool is built for speed select, click, done.
3.1 Where to Find the Tool
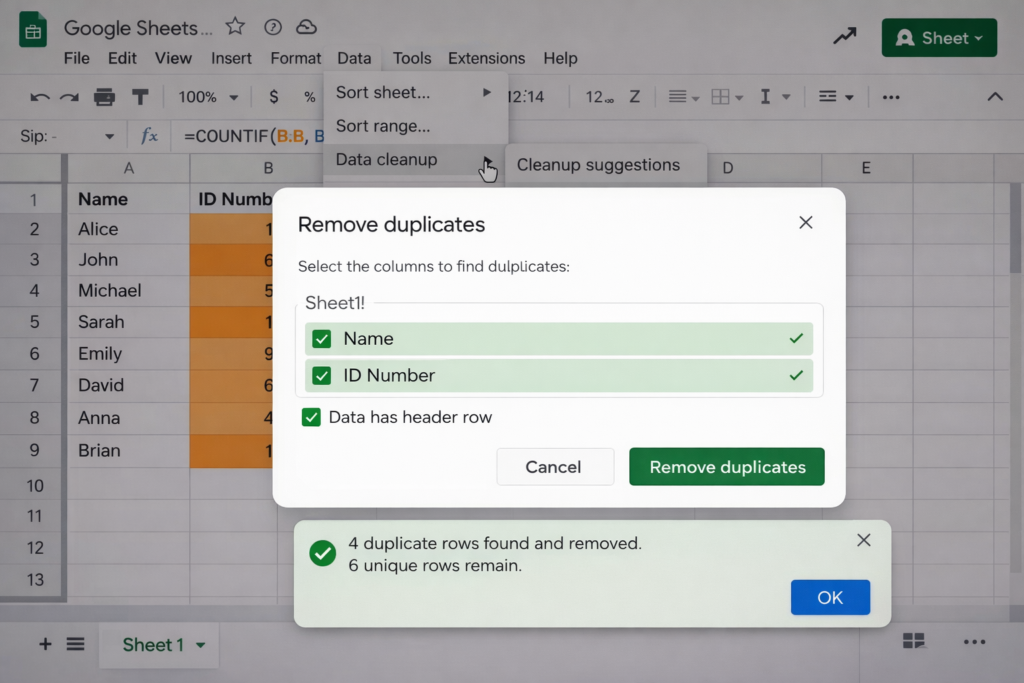
You’ll find it tucked neatly inside Google Sheets’ data tools:
Data → Data cleanup → Remove duplicates
This opens a dialog box where you control exactly how duplicates are identified and removed.
3.2 Step-by-Step Process
Selecting the data range
Start by highlighting the cells you want to clean. This can be a single column, multiple columns, or an entire table. If you skip this step, Google Sheets may guess the range and guesses are risky.
Using the header row option
If your data includes column headers, check the option labeled “Data has header row.” This prevents Google Sheets from treating your headers as duplicate values.
Choosing columns to scan
Next, select which columns should be checked for duplicates.
- One column selected → duplicates are based on that column only
- Multiple columns selected → duplicates are based on matching combinations
This step defines what “duplicate” actually means for your data.
Confirming removal and results
Click Remove duplicates, and Google Sheets immediately deletes the extra entries. A confirmation message appears, showing how many duplicates were removed and how many unique rows remain.
3.3 When This Method Works Best
This method is best when:
- You want permanent deletion, not just identification
- You’re happy keeping the first occurrence of each value
- You’re doing a one-time cleanup on imported or copied data
Because it deletes data instantly, this tool is not ideal when you need review, labeling, or ongoing duplicate tracking. Think of it as a cleanup hammer powerful, but final.
4. Method 2: Highlighting Duplicates with Conditional Formatting
When you want visibility before deletion, conditional formatting is the safer, smarter choice. It lets you see duplicates without touching the data.
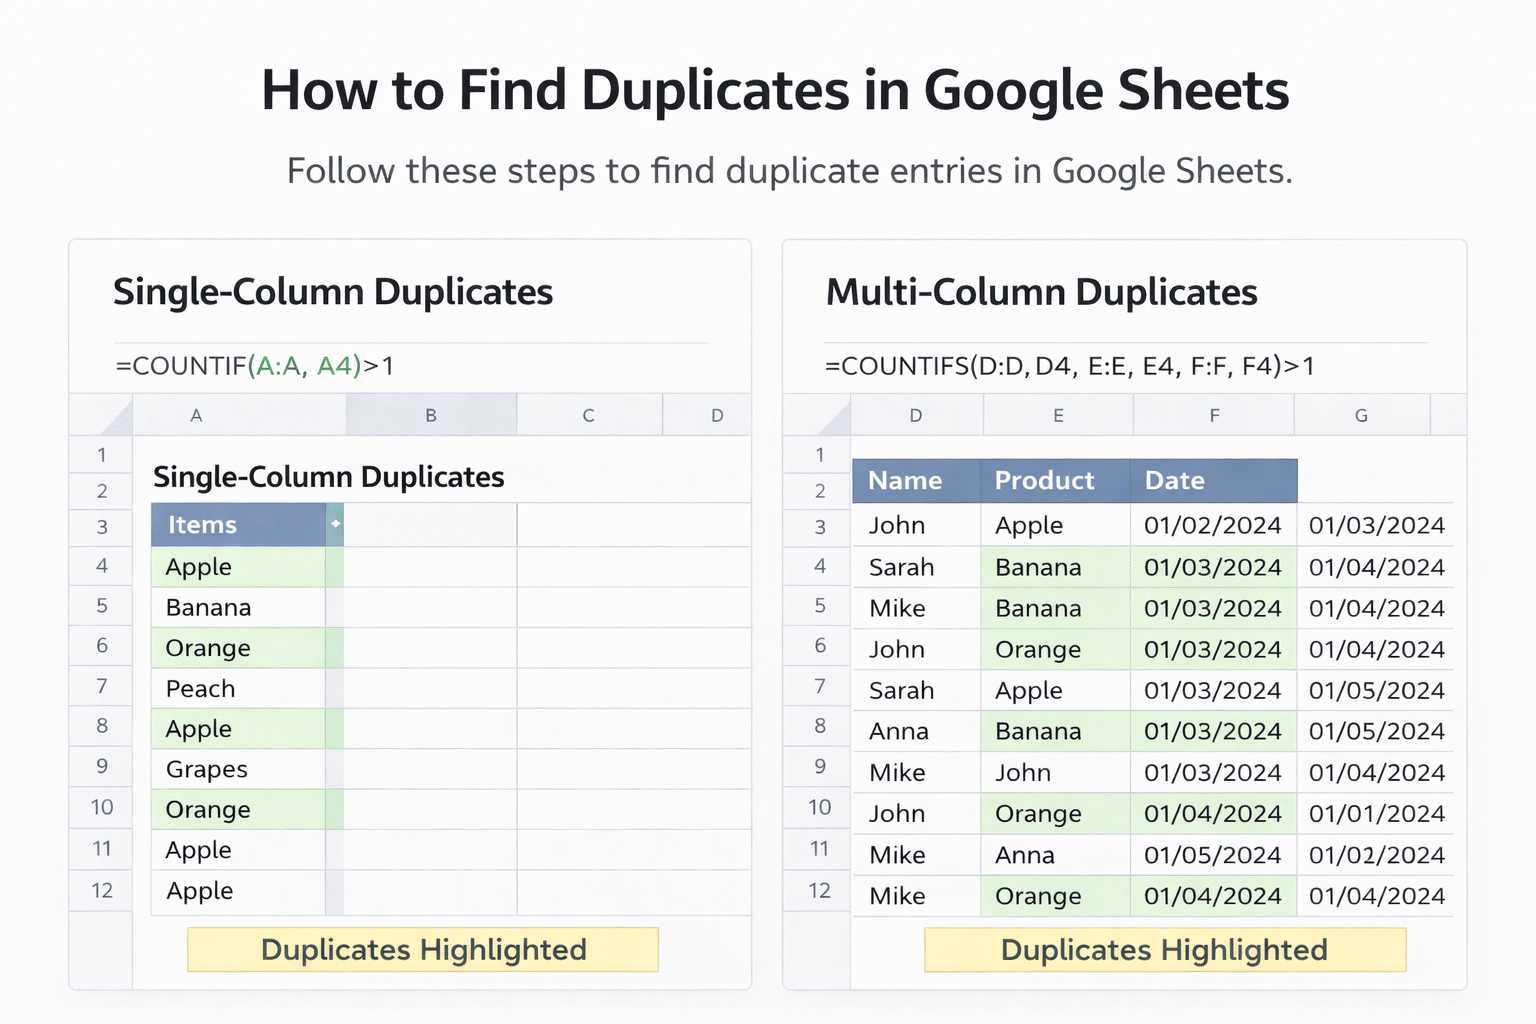
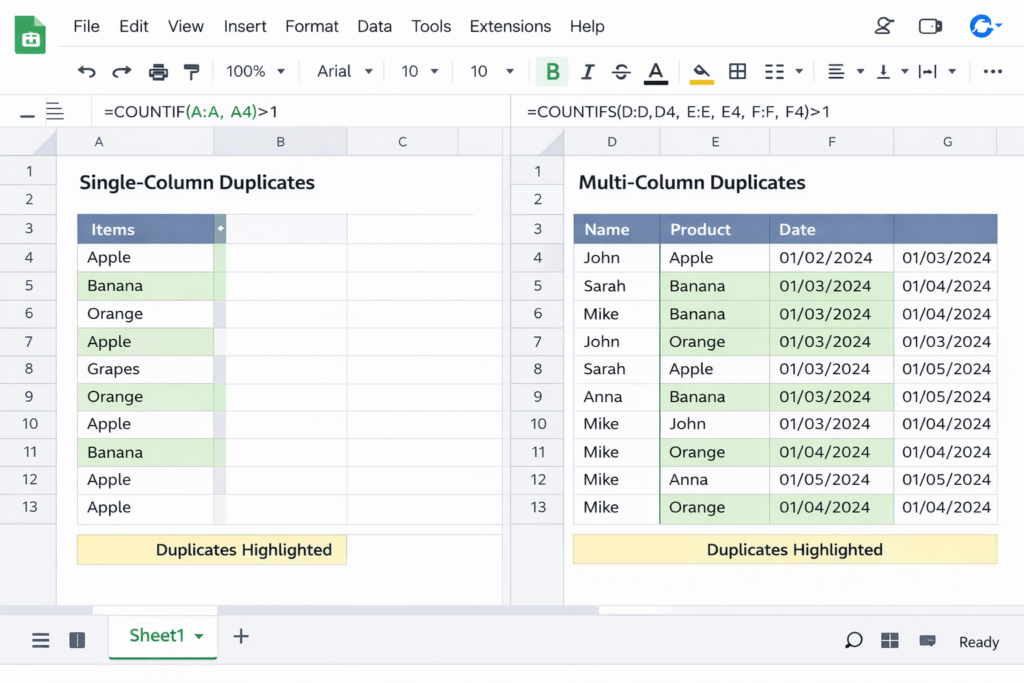
4.1 Highlighting Duplicates in a Single Column
Selecting the range
Highlight the column you want to check, such as B2:B10. This keeps the rule focused and avoids false positives.
Using a custom formula with COUNTIF
Choose Format → Conditional formatting, then select Custom formula is and use:
=COUNTIF($B$2:$B$10,$B2)>1
This formula checks whether a value appears more than once in the selected range.
Applying visual formatting
Pick a fill color light orange or red works well and apply the rule. All duplicate values instantly stand out.
4.2 Highlighting Duplicates Across Multiple Columns or Rows
For larger datasets or full-row checks, you can apply conditional formatting using a broader COUNTIF setup with ADDRESS and INDIRECT. This allows Google Sheets to compare values dynamically across wide ranges like A:Z.
Once applied, the formatting scales across rows and columns, making it ideal for tables where duplicates aren’t limited to a single column.
4.3 Reviewing and Removing Highlighted Duplicates
Filtering by color
After duplicates are highlighted, use the filter tool to filter by fill color. This isolates duplicate entries instantly.
Manual review before deletion
This step is where conditional formatting shines. You can review each duplicate, decide what stays, and delete only what’s unnecessary no accidental data loss, no regrets.
This method is perfect when accuracy matters more than speed and when duplicates need human judgment before removal.
5. Method 3: Finding Duplicates Using Formulas
Formulas give you precision. Instead of deleting or just highlighting data, they let you measure, label, and control duplicates in a way that’s perfect for analysis and ongoing workflows.
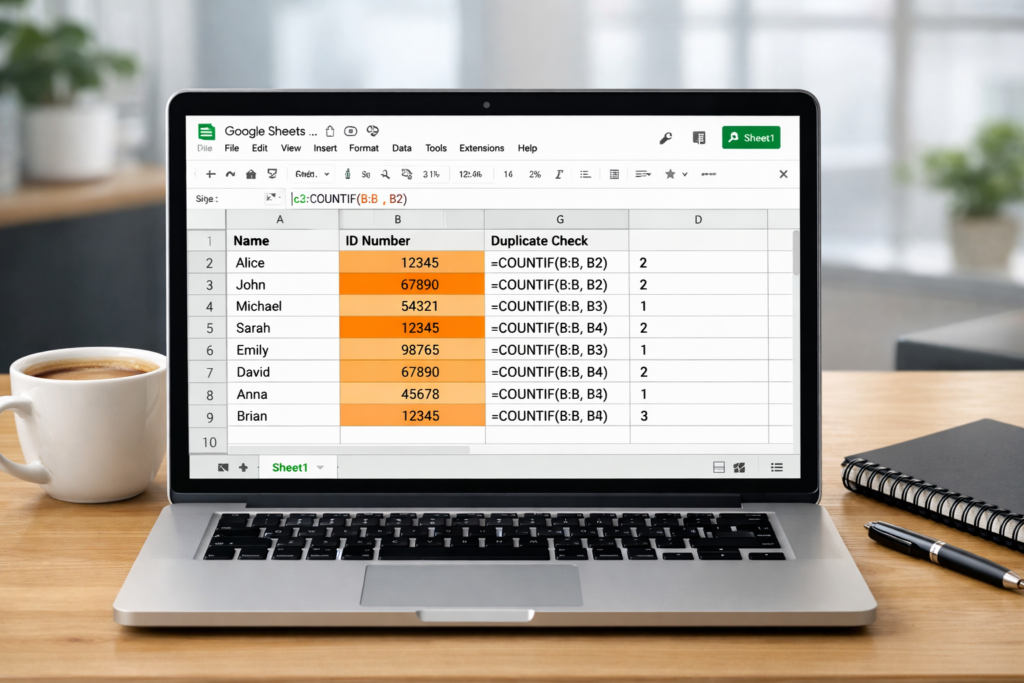
5.1 Counting Duplicate Occurrences with Helper Columns
COUNTIF formula setup
The simplest way to detect duplicates is by counting how many times a value appears. In a helper column, you can use a COUNTIF formula to check each cell against the full range. If the count is greater than one, that value is a duplicate.
This approach doesn’t change your data it simply exposes repetition in a clean, numerical way.
Using ARRAYFORMULA for larger datasets
For bigger sheets, ARRAYFORMULA removes the need to drag formulas down manually. It applies the duplicate-counting logic across the entire column automatically, making it ideal for growing datasets or imported data that updates frequently.
5.2 Labeling Values as Duplicate or Unique
IF + COUNTIF logic
Once you can count duplicates, labeling them is the next step. By combining IF with COUNTIF, you can assign clear text labels like “Duplicate” or “Unique” based on whether a value appears more than once.
Clear status tagging for analysis
These labels are incredibly useful for filtering, reporting, or sharing sheets with teammates. Instead of explaining formulas, you’re giving them instantly readable statuses that make decisions faster and cleaner.
5.3 Identifying Duplicate Rows with COUNTIFS
Matching across multiple columns
When duplicates depend on more than one column, COUNTIFS is the right tool. It checks whether multiple column values match at the same time essentially validating entire rows instead of single cells.
Use cases for full-row validation
This is especially useful for records like orders, contacts, or registrations where a duplicate only matters if all key fields match. It helps catch subtle duplicates that basic checks would miss.
5.4 Extracting Unique Data Only
Using UNIQUE to keep first occurrences
The UNIQUE function pulls out distinct rows or values while keeping the first occurrence of each. It’s perfect when you want a clean version of your data without touching the original sheet.
Removing all duplicates entirely with UNIQUE options
With the right configuration, UNIQUE can also remove every repeated value, leaving only entries that appear once. This is ideal for creating validated lists, reports, or clean data sources.
6. Method 4: Counting Duplicates with Pivot Tables

Pivot tables are built for summarizing data and that makes them surprisingly powerful for duplicate analysis.
6.1 Creating a Pivot Table
Insert → Pivot table
Start by selecting your data, then go to Insert → Pivot table. Google Sheets will prompt you to place it in a new sheet or an existing one.
Selecting source data
Make sure your source range includes all rows you want to analyze. Pivot tables update automatically when this range changes.
6.2 Grouping and Counting Duplicate Values
Rows setup
Add the column you want to check for duplicates to the Rows section. This groups identical values together.
COUNT vs COUNTA usage
Add the same column to Values and choose:
- COUNT for numerical data
- COUNTA for text or mixed data
The resulting count shows exactly how many times each value appears.
6.3 When Pivot Tables Are the Best Choice
Pivot tables work best when:
- You need dynamic reporting, not static cleanup
- Your dataset is large or frequently updated
- You want a high-level view of duplicates without altering raw data
They’re less about deletion and more about insight perfect for spotting patterns before taking action.
7. Choosing the Right Method for Your Use Case
Not all duplicates should be treated the same way. The right method depends less on the tool and more on what you’re trying to achieve.
Quick cleanup vs analysis
If your goal is to clean a list and move on, the built-in Remove duplicates tool is the fastest option. But if you need to understand why duplicates exist or how often they appear, formulas and pivot tables are the better choice. Cleanup removes the problem; analysis explains it.
Visual review vs automation
When accuracy matters, visual methods like conditional formatting give you control. You can see duplicates, review them, and decide what stays. Automation through formulas, UNIQUE, or pivot tables is better when dealing with large datasets where manual review isn’t practical.
One-time task vs recurring workflow
For one-off imports or copied data, manual tools work perfectly. But if your sheet updates regularly from forms, integrations, or shared edits formula-based methods and pivot tables create systems that keep working without repeated effort.
Choosing the right approach upfront saves time, prevents mistakes, and keeps your data reliable as it grows.
8. Common Duplicate-Handling Scenarios
Here’s how the methods covered in this guide apply to real-world situations you’ll encounter most often.
Highlight duplicate cells step by step
Use conditional formatting with COUNTIF to visually flag repeated values without deleting anything. This is ideal for review, audits, or collaborative sheets.
Remove duplicate rows while keeping the first entry
The built-in Remove duplicates tool works best here. Select the full dataset, choose the relevant columns, and let Google Sheets keep the earliest record automatically.
Mark duplicates across multiple columns
Formulas using COUNTIFS allow you to label rows as duplicates only when multiple column values match, making them perfect for records, contacts, or transactional data.
Count duplicate occurrences
Helper columns with COUNTIF or pivot tables make it easy to see how often each value appears. This is especially useful for reporting, validation, or quality checks.
Automatically remove duplicates with Apps Script (overview only)
For advanced users, Apps Script can automate duplicate removal on a schedule or trigger. This is useful for high-volume or shared sheets, but it requires careful setup to avoid unintended data loss.
Handled correctly, duplicates stop being a problem and start becoming a signal you can actually use.
9. Helpful Resources for Deeper Learning
To level up your Google Sheets skills beyond this guide, check out these excellent resources:
- Zapier’s guide on finding and removing duplicates in Google Sheets — This article walks through duplicate detection, removal, and getting unique values, with practical examples you can follow step by step. How to find and remove duplicates in Google Sheets (Zapier)
- Ablebits’ methods for finding duplicates in Google Sheets — A detailed overview of deduplication tools and techniques, plus options for handling duplicates in various ways. 7 easy ways to find and remove duplicates in Google Sheets (Ablebits)
- Coursera’s conditional formatting tutorial — A beginner-friendly walkthrough for highlighting duplicates using conditional formatting and formulas like COUNTIF — perfect if you want visual insights before removing anything. How to Highlight Duplicates in Google Sheets (Coursera)
These guides mix expert tips with visuals and examples, making them great follow-ups to what you’ve learned here.
10. Conclusion
Duplicates are inevitable but messy data doesn’t have to be. Google Sheets gives you multiple ways to find, highlight, count, and remove duplicates, each suited to a different situation.
Quick tools handle fast cleanups. Conditional formatting gives you visibility and control. Formulas and pivot tables offer precision and insight. The key is choosing the method that matches your data size, workflow, and end goal.
When you treat duplicates intentionally instead of reactively, your sheets become cleaner, more accurate, and far easier to trust. And once your data is solid, everything built on top of it works better too.
Frequently Asked Questions (FAQ)
1. How do I find duplicates in Google Sheets without deleting anything?
You can use conditional formatting or formulas like COUNTIF to highlight or label duplicate values without removing them. This is ideal when you want to review duplicates manually before taking action.
2. What is the easiest way to remove duplicates in Google Sheets?
The fastest method is the built-in Remove duplicates tool. Select your data, go to Data → Data cleanup → Remove duplicates, choose the columns to check, and Google Sheets will keep the first occurrence while deleting the rest.
3. How can I find duplicate rows instead of duplicate cells?
To detect duplicate rows, use formulas with COUNTIFS across multiple columns or select all relevant columns when using the Remove duplicates tool. This ensures duplicates are identified only when entire rows match.
4. Can Google Sheets automatically update duplicate counts when new data is added?
Yes. Using formulas with ARRAYFORMULA or pivot tables allows duplicate counts to update automatically as new rows are added, making them perfect for dynamic or growing datasets.
5. Should I always remove duplicates from my data?
Not always. Sometimes duplicates are intentional or useful for analysis. It’s often better to identify and review duplicates first, especially in shared or critical datasets, before deciding whether removal is necessary.


