

-

- No Comments
- January 13, 2026
How to add channels on OVHD
1. Introduction
OpenView HD, commonly known as OVHD, is South Africa’s free-to-air satellite TV service. No monthly fees. No contracts. Just a decoder, a dish, and access to local channels like SABC 1–3, e.tv, and a growing list of entertainment and radio stations.
But here’s where many users get stuck.
You power everything on, expecting channels to load automatically and instead you’re met with messages like “No Channel,” “No Signal,” or “Channels Not Activated.” Sometimes the decoder scans, finishes successfully… and still shows nothing useful.
This guide exists for one reason: to fix that.
You’ll learn why OVHD channels don’t appear by default, what the most common errors actually mean, and exactly what needs to be done to move from a blank screen to a fully working channel lineup without guesswork or unnecessary technician calls.
2. Understanding OVHD Channel Issues
Before jumping into scans and settings, it’s important to understand why OVHD behaves the way it does. Most problems fall into two predictable categories.
2.1 No Channel | No Signal Error
What this error means
When your OVHD decoder displays No Channel or No Signal, it’s telling you one thing:
👉 It’s not receiving a usable satellite signal.
This doesn’t always mean the decoder is faulty. In most cases, it’s a setup or signal issue.
Typical causes
- The satellite dish is not aligned to the correct OVHD satellite
- The LNB cable is loose, damaged, or connected to the wrong port
- Signal strength or quality is too low
- Temporary signal loss due to heavy rain (rain fade)
- The decoder hasn’t been scanned properly after installation
Until a stable signal is detected, the decoder cannot load or display channels no matter how many times you rescan.
2.2 Channel 100 Only Showing
Why only the test channel appears
If your scan completes successfully and only Channel 100 appears, this is actually a good sign. It means:
- The dish is aligned correctly
- The decoder is receiving signal
- The scan worked
However, Channel 100 is just a test channel. No other channels will load until the decoder is activated.
Link to activation requirement
This situation points directly to one issue:
👉 Your OVHD decoder has not been activated yet.
Activation unlocks the full channel list. Without it, the decoder stays in a limited mode even though everything else appears to be working. The activation process is simple and can be done using your phone, which we’ll cover step by step later in this guide.
3. Prerequisites Before Adding Channels
Before you attempt to scan or activate channels, your OVHD setup needs to meet a few non-negotiable requirements. Skipping these steps is the fastest way to end up with “No Signal” errors and empty channel lists.
3.1 Satellite & Dish Requirements
Correct satellite position
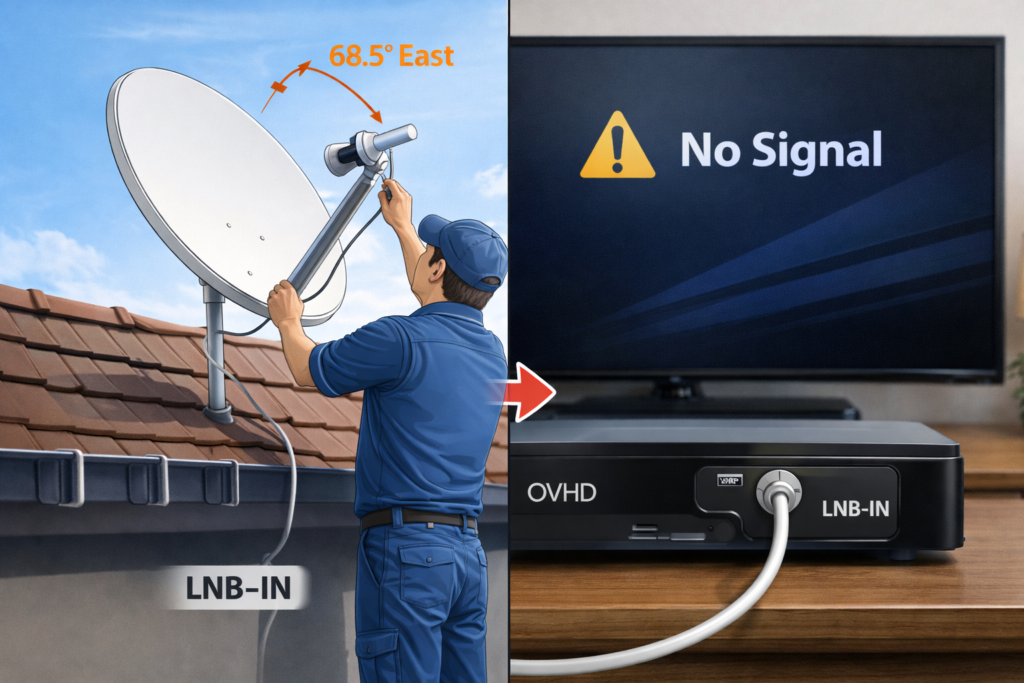
OVHD broadcasts via the IS-20 / SES-5 satellite, positioned at 68.5° East. Your satellite dish must be aligned precisely to this position. Even a small deviation can prevent the decoder from locking onto the signal.
Why dish alignment matters
Satellite TV doesn’t tolerate guesswork. A poorly aligned dish results in:
- Low or unstable signal
- Failed channel scans
- Intermittent “No Signal” errors
If the dish was recently moved, installed by an inexperienced installer, or exposed to strong wind, alignment should be checked before doing anything else.
3.2 Cable & Hardware Connections
LNB cable connection
The cable coming from the dish’s LNB must be firmly connected to the port labeled LNB-IN or DISH IN on the OVHD decoder.
Loose connectors, damaged cables, or incorrect ports are among the most common causes of missing channels.
Decoder-to-TV connection options
You can connect your OVHD decoder to your TV using either of the following:
HDMI (recommended)
- Best picture and sound quality
- One cable for both audio and video
- Ideal for modern TVs
AV / RCA (red, white, yellow)
- Used on older TVs
- Ensure each cable matches the correct color port
- Incorrect color matching can cause no picture or no sound
Once connected, set your TV to the correct input source (HDMI or AV) before proceeding.
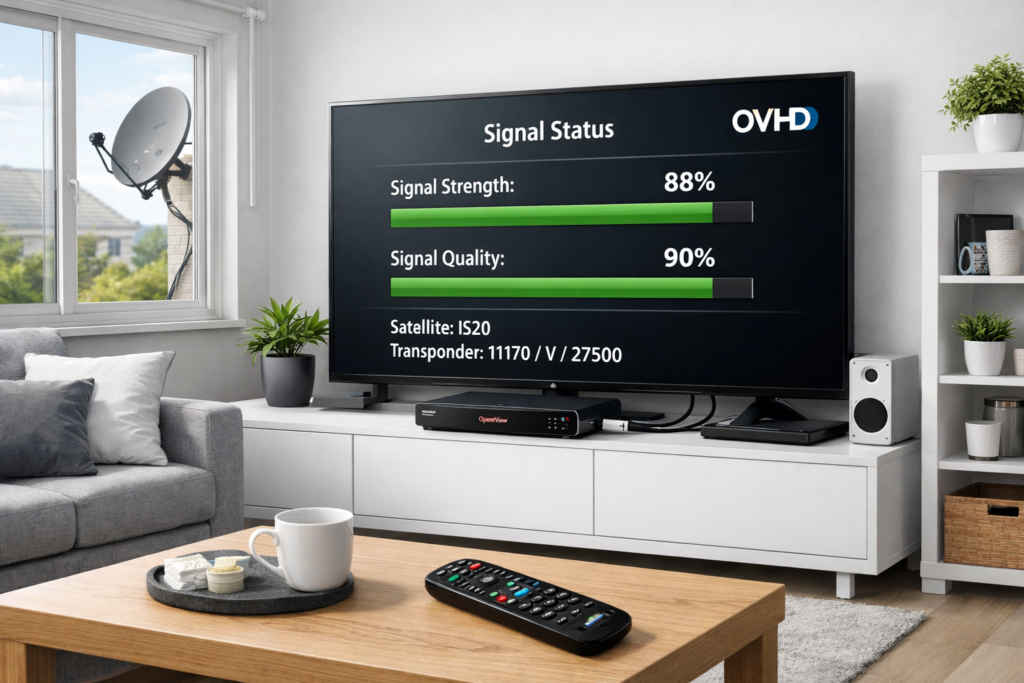
3.3 Signal Strength Check
Using the HELP button
Press the HELP button on your OVHD remote to open the signal information screen. This is your fastest way to confirm whether the decoder is receiving a usable signal.
Required signal strength and quality
For reliable channel scanning:
- Signal Strength: 85% or higher
- Signal Quality: 85% or higher
Anything below this threshold can cause scans to fail or channels to disappear. If levels are low, dish realignment is required before moving forward.
4. Step-by-Step: How to Add Channels on OVHD
Once your dish, cables, and signal are confirmed, adding channels is a straightforward process.
4.1 Accessing the Installation Menu
- Turn on both the TV and OVHD decoder
- Make sure the TV is on the correct input
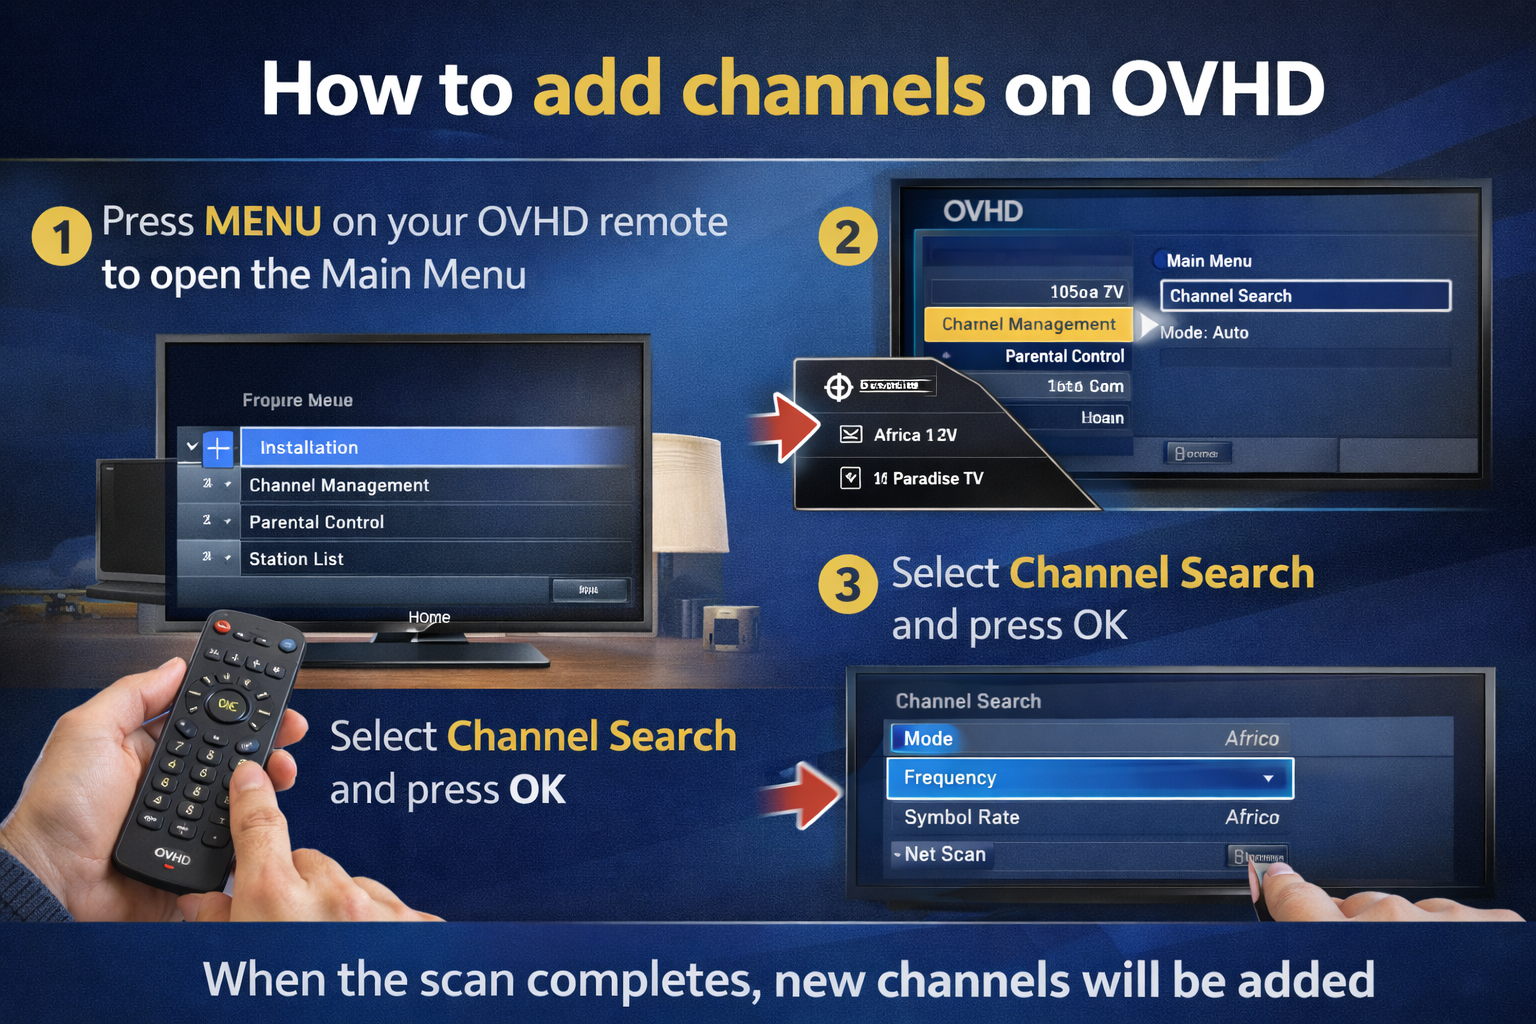
- Press the MENU button on the OVHD remote
This opens the main system menu where all channel settings are located.
4.2 Navigating to Channel Search
From the menu:
- Select Settings
- Go to Installation or Channel Search
You may be asked for a PIN. If unchanged, the default is usually 0000.
4.3 Running an Automatic Scan
- Choose Automatic Scan or Search Channels
- Select the correct LNB type if prompted (commonly Universal or Restore for migrated dishes)
- Press the red button on the remote to start the scan
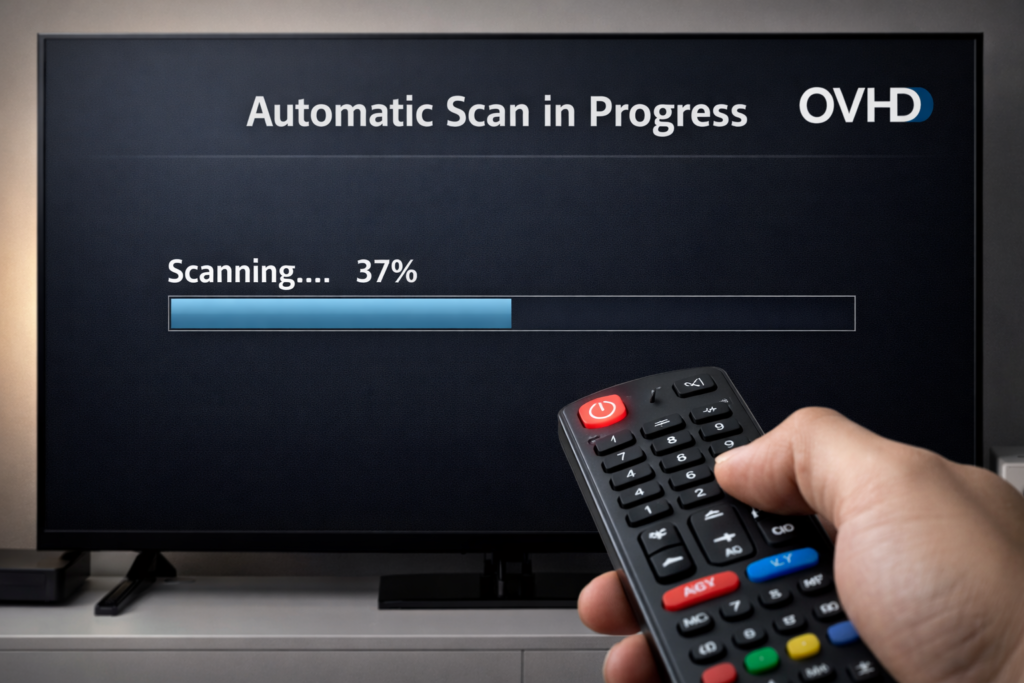
The decoder will now search the satellite for available OVHD channels.
4.4 Completing the Scan
What to expect during scanning
- Progress bars for signal and channel detection
- No user input required during the process
- Scan time may take a few minutes
Channel 100 appearing first
Once the scan finishes, Channel 100 (the OVHD test channel) usually appears first. This confirms:
- The scan was successful
- The signal is locked
If only Channel 100 is visible, the next step is activation which unlocks the full channel lineup.
5. Activating Your OVHD Decoder
Scanning channels alone is not enough. OVHD decoders must be activated before the full channel lineup becomes available. This step is often missed, which is why many users get stuck even after a successful installation.
5.1 When Activation Is Required
“200 – Channels Not Activated” error
If you see this message on your screen, it means the decoder is correctly installed and receiving signal but it has not yet been registered on the OVHD system.
Channel 100 only issue
Another clear sign activation is required is when:
- The scan completes successfully
- Signal levels are good
- Only Channel 100 is available
Channel 100 is a test channel. All other channels remain locked until activation is completed.
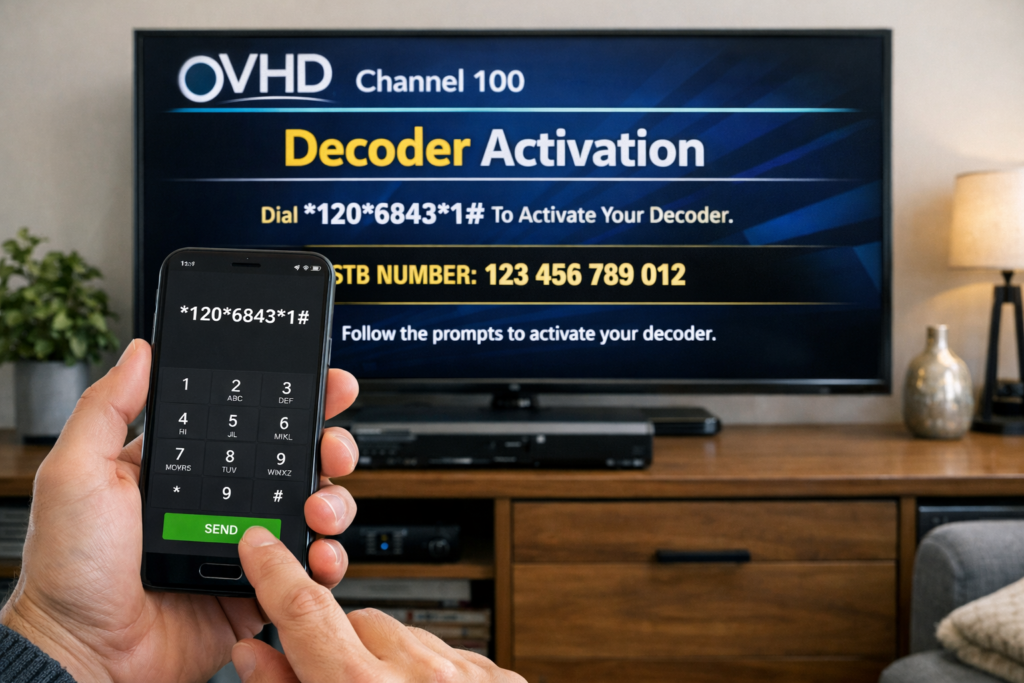
5.2 Activation via USSD Code
Activation can be done directly from your phone in a few minutes.
Finding your STB number
- Press the HELP button on your OVHD remote
- Note down the STB (Set-Top Box) number displayed on the screen
Dialing the activation code
- Using your phone, dial the activation USSD code shown on your TV screen
- Follow the voice or on-screen instructions
Entering STB details
- Enter the STB number when prompted
- Confirm the details carefully before proceeding
Decoder reboot and software update
Once activation is accepted:
- The decoder may reboot automatically
- A short software update may run
- This process can take a few minutes do not switch off the power
When complete, the decoder will refresh its channel list.
5.3 Confirming Successful Activation
Browsing channels
- Use the P+ / P- buttons on the remote
- Channels should now switch normally
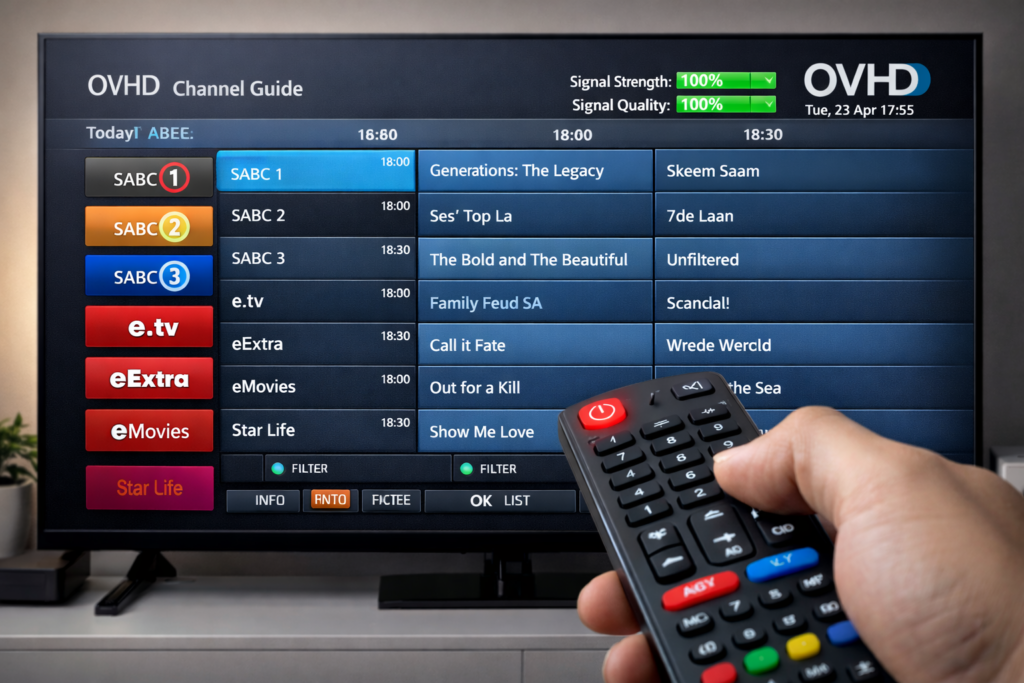
Expected channel lineup
After activation, you should see:
- SABC 1, SABC 2, SABC 3
- e.tv and related channels
- Additional entertainment, lifestyle, and radio channels
If these channels are visible, your OVHD decoder is fully activated and ready to use.
6. Troubleshooting OVHD Channel Problems
If channels still don’t appear or errors persist, the issue is usually hardware or signal-related.
6.1 No Satellite Found / No Channels
Reconnecting cables
- Disconnect the LNB cable from the decoder
- Check for bent pins or loose connectors
- Reconnect it firmly to the LNB-IN / DISH IN port
Rebooting the decoder
- Switch off the decoder at the power source
- Wait 30 seconds
- Power it back on and allow it to fully boot
This simple reset resolves many detection issues.
6.2 Low Signal Strength
Checking signal levels
- Press the HELP button on the remote
- Check signal strength and quality readings
If either is below 85%, channel stability is not guaranteed.
Dish realignment
- Slight dish adjustments can dramatically improve signal
- Professional realignment is recommended if you’re unsure
Rain fade considerations
Heavy rain or storms can temporarily reduce satellite signal. In these cases:
- Wait for weather conditions to clear
- Signal usually restores automatically
6.3 Factory Reset (Last Resort)
When to use it
A factory reset should only be considered if:
- Scans fail repeatedly
- Activation does not complete
- Settings have been changed incorrectly
Why to avoid on new decoders
New OVHD decoders often auto-configure themselves. Resetting them unnecessarily can:
- Remove preloaded settings
- Force repeated rescans and reactivation
Manual reference
If a reset is unavoidable, follow the official OVHD manual instructions carefully (typically referenced around pages 16–18).
7. Common OVHD Errors Explained
OVHD errors are usually straightforward once you know what they actually mean. Below are the most common messages users encounter and what’s really happening behind the screen.
No Channel
This error indicates that the decoder is powered on but no channels are loaded into the system.
Common reasons include:
- No successful channel scan has been completed
- The decoder was reset or installed without scanning
- Signal was unavailable during the scan
A fresh automatic scan, followed by activation if required, usually resolves this issue.
No Signal
“No Signal” means the decoder is not receiving usable satellite input.
This is almost always related to:
- Dish misalignment
- Loose or damaged LNB cable
- Low signal quality due to weather or obstruction
Until a stable signal is detected, channels cannot load or display.
Channels Not Activated
This error confirms that:
- The dish is aligned
- Signal is present
- The scan worked
But the decoder has not yet been activated on the OVHD system. Activation unlocks the full channel lineup. Without it, only limited functionality (such as Channel 100) is available.
Decoder Not Scanning Channels
When scanning doesn’t start or completes with zero results, the usual causes are:
- Incorrect LNB type selected
- Weak signal strength or quality
- Installation menu settings changed incorrectly
Checking signal levels first, then rerunning an automatic scan with correct settings, is the best fix.
8. Key Resources and Official Guides
To make setup, troubleshooting, and activation even easier, bookmark these authoritative guides and video tutorials.
📘 Detailed Step-by-Step Guide (2025)
A thorough, up-to-date walkthrough covering installation, scanning, activation and error fixes:
👉 https://tvandvideodoctor.co.za/blog/openview-customer-care-contacts-fixes/ (OpenView customer care and installation guidance)
📄 Official OVHD Brochure (PDF)
The original OpenView HD decoder brochure with installation tips and specification details:
👉 https://www.spacetv.co.za/wp-content/uploads/2018/11/openview-brochure.pdf
📺 Updated OVHD Channel List
A regularly updated list of channels available on OpenView HD:
👉 https://www.ovhdinstaller.co.za/channel_list.html
🎥 Video Tutorials
⏯️ No Signal & Troubleshooting Video
Visual guide to solving signal issues and dish alignment basics:
👉 Search YouTube for “OVHD No Signal” tutorials
⏯️ Installation & Activation Walkthrough
Comprehensive installation and activation demo on YouTube:
👉 https://www.youtube.com/watch?v=yYc1V50j_bI (OpenView decoder install + activation)
Bonus Official OVHD Setup Animation
Educational animation showing basic satellite setup and pointing:
👉 https://www.youtube.com/watch?v=Y9MhwAwYcEc (OVHD Instruction Animation)
9. Related OVHD Guides
If you’re still experiencing issues or want deeper clarity on specific steps, the guides below cover the most common OVHD problems in detail. These are especially useful if you prefer to fix things yourself before involving an installer.
Troubleshoot OVHD No Signal Issues
A focused guide that walks through:
- Dish alignment checks
- Cable and LNB troubleshooting
- Signal strength verification
- Weather-related signal loss
Ideal if your screen frequently shows No Signal or channels disappear unexpectedly.
How to Activate an OVHD Decoder Using USSD
A step-by-step breakdown of:
- Finding your STB number
- Dialing the correct activation code
- Completing activation without customer support
Useful when Channel 100 is showing but other channels remain locked.
Best LNB Settings for OVHD
Covers:
- Recommended LNB types
- Common configuration mistakes
- Settings to use for migrated or shared dishes
Perfect if scans complete but channels don’t load correctly.
How to Perform an Automatic Channel Scan on OVHD
Explains:
- Where to find the scan option
- Correct menu paths
- What a successful scan looks like
Helpful after a factory reset, dish adjustment, or new installation.
How to Connect an OVHD Decoder to TV (HDMI & RCA)
A simple connection guide covering:
- HDMI setup for modern TVs
- AV / RCA setup for older TVs
- Input source selection
Prevents “no picture” or “no sound” confusion after installation.
10. Final Checklist Before Calling an Installer
Before spending money on a technician, run through this quick checklist. Most OVHD issues are resolved right here.
- ✅ Dish alignment confirmed to IS-20 / SES-5 (68.5° East)
- ✅ Signal strength and quality above 85%
- ✅ Automatic channel scan completed successfully
- ✅ Decoder activated using USSD
- ✅ Channels switching correctly using P+ / P-
If every box is checked and the problem persists, then and only then it’s time to call an installer.
Frequently Asked Questions (FAQ)
1. Why does my OVHD decoder show “No Channel” after installation?
This usually happens when a channel scan was not completed successfully or the decoder was scanned without a stable satellite signal. Check your signal strength first, then run an automatic channel scan again. If Channel 100 appears, activation may still be required.
2. What does Channel 100 mean on an OVHD decoder?
Channel 100 is a test channel. Its presence confirms that your dish is aligned and the decoder is receiving signal. However, it also means the decoder is not yet activated, which is why other channels are missing.
3. How long does OVHD activation take after using the USSD code?
Activation usually takes a few minutes. The decoder may reboot and update its software automatically. Once complete, the full channel lineup should appear without needing another scan.
4. What signal strength is required for OVHD channels to work properly?
For reliable viewing and successful channel scans, both signal strength and signal quality should be above 85%. Anything lower can cause missing channels or frequent signal loss.
5. Can I reset my OVHD decoder if channels are not showing?
A factory reset should be a last resort. It is only recommended if scans and activation fail repeatedly. On new decoders, resetting can remove preconfigured settings and create additional setup problems.


